Custom Camera Calibration for Adobe’s Raw Process Engine
When Thomas Knoll created Adobe Camera Raw there was no universal Raw processor that worked with the majority of digital cameras. Camera manufacturers had their own software to support only their own cameras, and for the most part, it was pretty dreadful. There were a few third party applications that were attempting to work with the major camera brands but nothing like Adobe’s offering which rapidly became the standard against which everything that followed would have to compete. Today there are several different Raw processors, and each has something to offer to their users, but ACR dominates with a much larger user base, due in large part to its integration with Photoshop, and a superior interface. ACR also supports more cameras than most of the competing software, and manages to update rapidly to support the newest cameras. To achieve this support for new cameras, without the help of the camera manufacturers engineering staff, Adobe had to develop a method of calibrating ACR to generate color accuracy with a wide range of different sensors. Initially, this method was only available to Adobe technicians, and was used only to generate support for the different cameras as they became available. Eventually Adobe made their DNG Profile Editor available as free beta software. This little application can be used to build a custom ACR calibration profile that can be used inside ACR to support your specific camera sensor with a more accurate color rendering than the default profiles that come with ACR. This collection of default profiles can be accessed from the Calibration tab in ACR as shone below…
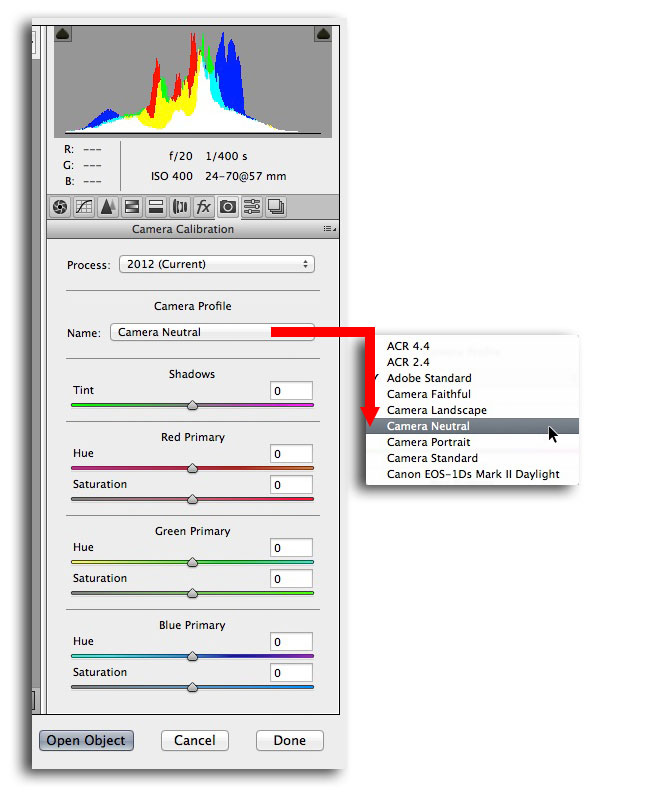
The default profiles available in ACR are edited color renderings for each of the camera models supported by ACR – the last one in the list above is a custom profile made with the DNG Profile Editor foy my own camera.
Adobe’s DNG Editor software is still available as a free beta- you can download it here:
DNG Profile Editor for Windows
DNG Profile Editor Documentation
For some odd reason Adobe has never made this software widely available – you really have to hunt for it to find it. At any rate, some time after the software was introduced, X-Rite developed a calibration software of its own, available as part of its ColorPassport package, but also available as a free software download – you can get it here:
ColoChecker Passport application – I believe this is the Mac version, you can probably download the Windows version from X-Rite’s support page here:
ColorChecker Passport Support – click on the support tab and then on the software downloads to see the application and the Lightroom Plugin.
Both the Adobe DNG Editor and the X-Rite ColorChecker Passport application generate a special dng profile that can be used in ACR. Both also utilize the X-Rite 24-patch ColorChecker target for calibration.
The X-Rite software is very simple and straightforward, you run it on a DNG file and it generates a profile and saves it into the appropriate place for ACR access. Adobe’s DNG Editor is much more robust and it offers editing functionality so you can tweak the profile to your liking – I offer some detailed instructions for such tweaking for better skin tones in my Skin book.
There is another camera calibration application offered by Datacolor. This also works with ACR & Lightroom but Datacolor takes a different approach. Instead of generating a dng camera profile, The software creates a Hue-Saturation-Lightness preset, that can be saved as part of your personal camera default inside ACR or Lightroom. The beauty of this approach is that camera calibration is not limited to RAW files, you can calibrate to jpegs, and even video! This software does not use the X-Rite ColorChecker target, for obvious reasons, so they provide their own version of the target known as the SpyderCheckr that contains essentially the same color patches in a slightly different layout, plus an additional 24 patches with other colors. The software comes with the SpyderCheckr, and since you have to use it with their target there’s no point in me offering a download link – you’d still need to purchase the target, even if you already have a ColorChecker target. The rest of this post is devoted to a comparison of all three systems, along with my test results, based on measuring the lab color values of an image of the X-Rite ColorChecker rendered through the different profiles and presets, compared to X-Rite’s published values. You can find X-Rite’s colorimetric values for the ColorChecker here:
As far as I know Adobe Camera Raw/Lightroom is the only RAW processor software that offers custom calibration options, with Datacolor’s additional support for Phocus, Hasselblad’s raw processing software, as the only exception.
The Software in Use
 The DNG Profile Editor is an application designed to create and edit a DNG profile. This profile is not to be confused with a color management profile like a .icc or .icm file that is a component of the industry standard Colorsync system developed by Apple in the early 1990s. This profile is only for use in Adobe Camera Raw and Lightroom and has no functionality beyond that. The DNG Profile Editor is designed to do much more than simply calibrate to an X-Rite ColorChecker target, and it has a very sophisticated color editing function that can be used to subtly adjust very limited ranges of color. The screenshot below shows the interface…

Open a dng version of a shot of the X-Rite ColorChecker & line up the circles with the corner patches

Once you click on “Create Color Table” you are ready to save the profile or edit the profile – above you can see that a spot on the color wheel is located for editing by moving the cursor over a patch on the target. I will typically move this spot slightly towards yellow for a portrait oriented profile.
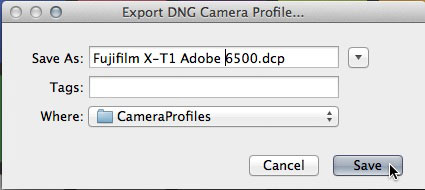
When you select Export DNG profile – it automatically finds the correct location for use in ACR & Lightroom
 The ColorChecker Passport software is much simpler, and is only designed to generate a DNG profile. You can use the stand-alone application, or you can use a plugin that works inside of Lightroom as an export option. The Lightroom plugin is particularly convenient and it makes creating profiles push button easy. Like Adobe’s software, you can create a single illuminant profile or a dual illuminant profile that would have general application most suited for use in default settings. There are no controls to speak of – you simply open or export a white balanced shot of the ColorChecker, and the software automatically detects the color patches, and generates a profile.

The ColorChecker Passport software has a wizard interface that walks you through the use of the application – very easy!

The software automatically locates the patches & when you create the profile it automatically locates the correct location for the profile.
 The SpyderCheckr software is a stand-alone application that is also fairly simple. You need to generate a Tiff file from your original RAW file shot of the SyderCheckr target, and open it into the application. It is of course important that you properly white balance the image using the little gray eyedropper White Balance tool in ACR or Lightroom. There is no dual illuminant option because the software does not generate a profile – it simply builds an HSL preset that adjusts the slider settings in the HSL panel in ACR or Lightroom. As long as you do a proper white balance on the file, you should have a viable calibration. I have not noticed any serious drawbacks to leaving the slider setting presets in my camera default settings. Datacolor makes it easy to go into the SpyderCheckr software from Lightroom, and though not quite as convenient as the X-rite, one-step profile building process, it is very easy, as shown in the Lightroom screenshot below…
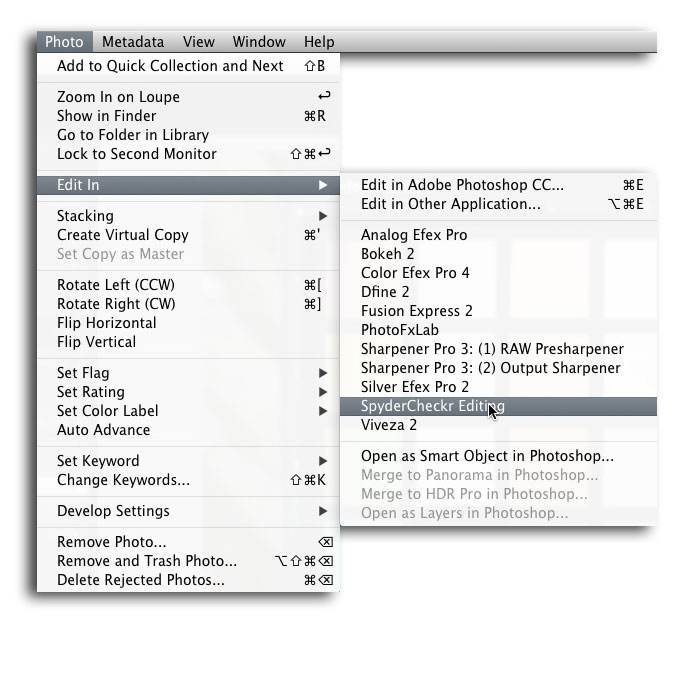
To get your target file into the SpyderCheckr software, you can simply initiate an “Edit In.. ” selection, as shown.

You have to manually scale the patch arrangement to line up with the SpyderCheckr software, but this is easy to do if you shoot the target correctly. The mode options give you suggested tweaks – “Colorimetric” is the default and seems to render a bit more neutral color – “Saturation” amps the saturation ( as expected) and “Portrait” seems to lighten and de-saturate some colors…
Test Scores Compared
Scores were derived from measuring the X-Rite ColorChecker target Lab values in Photoshop from the same RAW file rendered through the Profiles ( or presets in the SpyderCheckr, ) compared with X-Rites published values, given as a whole number difference. The ratio deviation was calculated as a ratio difference between a & b values; if the a & b value deviate in the same direction by the same amount the ratio is given as zero because the hue shift would not be noticeable, only a saturation difference would be evident – resulting ratio deviations for each patch were then added to derive a total for the ratio deviation. This last score is my own clumsy invention that is intended to offer some idea of visual perceptibility weighting in the test scores…
Test Results

Test results from the three applications
Overall Scores
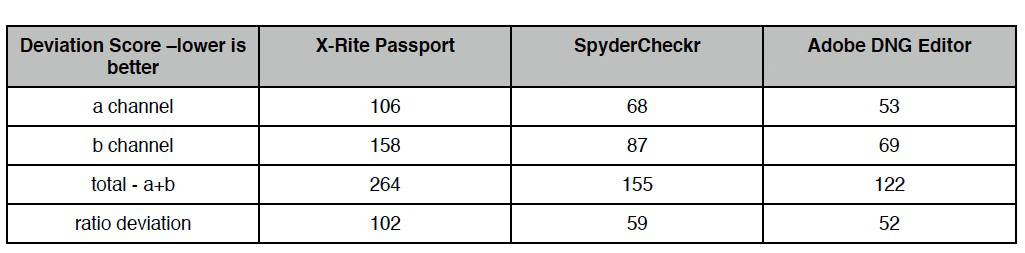
The overall deviation from the ideal values presented as a single whole number
Not surprisingly, the Adobe DNG editor comes out on top. The SpyderCheckr is assumed to be at a slight disadvantage in the scoring, because an X-Rite ColorChecker was used as the reference, and additional tests were not conducted against the SpyderChecker target. Still, the SpyderCheckr presets in ACR/Lightroom scored better against X-Rite Passport, and the ratio deviation was very close to the Adobe score. Additionally, because the SpyderCheckr uses HSL presets to achieve its rendering, you can combine it with a profile to fine tune the color rendering even further. Measuring a combination of the Adobe DNG profile with the SpyderCheckr preset gave a total a+b score of 112, and a ratio score of 48, a slight improvement, but still an improvement over what could be considered a really good score. Visually its splitting hairs! The Adobe DNG profile is closer in both a & b overall and doesn’t seem to favor any particular range for more accuracy. Which makes sense, given its ratio deviation score. The SpyderCheckr is similar, doing slightly worse with more saturated colors but fairly close with more muted & pastel colors. The X-Rite profile seems to want to render with more saturation, especially cooler colors. It is quite possible that some people will prefer the X-Rite rendering because of the enhanced saturation, but purely in terms of color accuracy, it is firmly in third place! Combining the SpyderCheckr with either Adobe or X-Rite offers some modest improvement, perhaps a little more with respect to the XRite Passport, but not enough to really worry about it. One thing to consider with regards to saturated colors – subtle hue shifts are harder to see, with the amount of saturation masking the effect. The same is true at the other end where colors approach neutral gray – small hue shifts can be almost impossible to see without an absolute neutral reference nearby. Hue accuracy is more apparent in mildly saturated colors. It is in this range of real world colors that the SpyderCheckr and the Adobe DNG editor do especially well.
As with any test of this kind, your results may vary. Ideally, one would have to do the test multiple times and average the results to come up with more meaningful numbers. The tests I ran were with targets captured by a Canon 5D mk II, and a different camera might yield different results. Visually, though you can easily see differences, deciding what “looks” best ends up being a somewhat subjective thing – good numbers do not necessarily equate to “good color” but its the only quantifiable measure we’ve got to compare. I have satisfied myself that whichever calibration software you choose, you will end up with a camera calibration that is better than the defaults built-in to the Adobe raw process engine. However, it is also worth noting that calibration itself is not a solution for creative excellence, only a starting place from which you can explore the best possible rendering of any given image.
Recommendations
If you already have a standard Munsel Chart like the X-rite ColorChecker or the GretagMacbeth ColorChecker that was its direct predecessor, download the Adobe DNG Profile Editor! At the moment, you simply can’t do a better calibration, and if you don’t have to invest in another expensive target, its definitely the way to go.
If, however, you do not have a target, I suggest you invest in the Datacolor SpyderCheckr system. The SpyderCheckr target is a high quality package with a user replaceable target that has fade indicators built-in, so you can know at a glance if you might need to replace the patches. The replacement patches are much less expensive than buying a whole new target which is quite an improvement from X-Rite’s recommendation to re-purchase after two years. I have a SpyderCheckr target that is 3 years old and I see no signs of fading! The SpyderCheckr has additional patches beyond the 24 standard ones on the reversible target “pages” that offer some modest functionality on set for white balance, etc… the target can be easily attached to a light stand – another convenience. As far as tweak ability goes, since the SpyderCheckr simply generates HSL slider settings, its an easy matter to manually fine tune the settings for your own visual preference. Probably the biggest advantage of the system is that camera calibration is not limited to Raw files, but can be applied to Jpegs, and very importantly, to video! For this reason alone, it would be highly recommended for photographers moving into video.
Look for a blog post about video calibration with the SpyderCheckr system soon!