Frequency Separation Retouching by Alessandro Bernardi
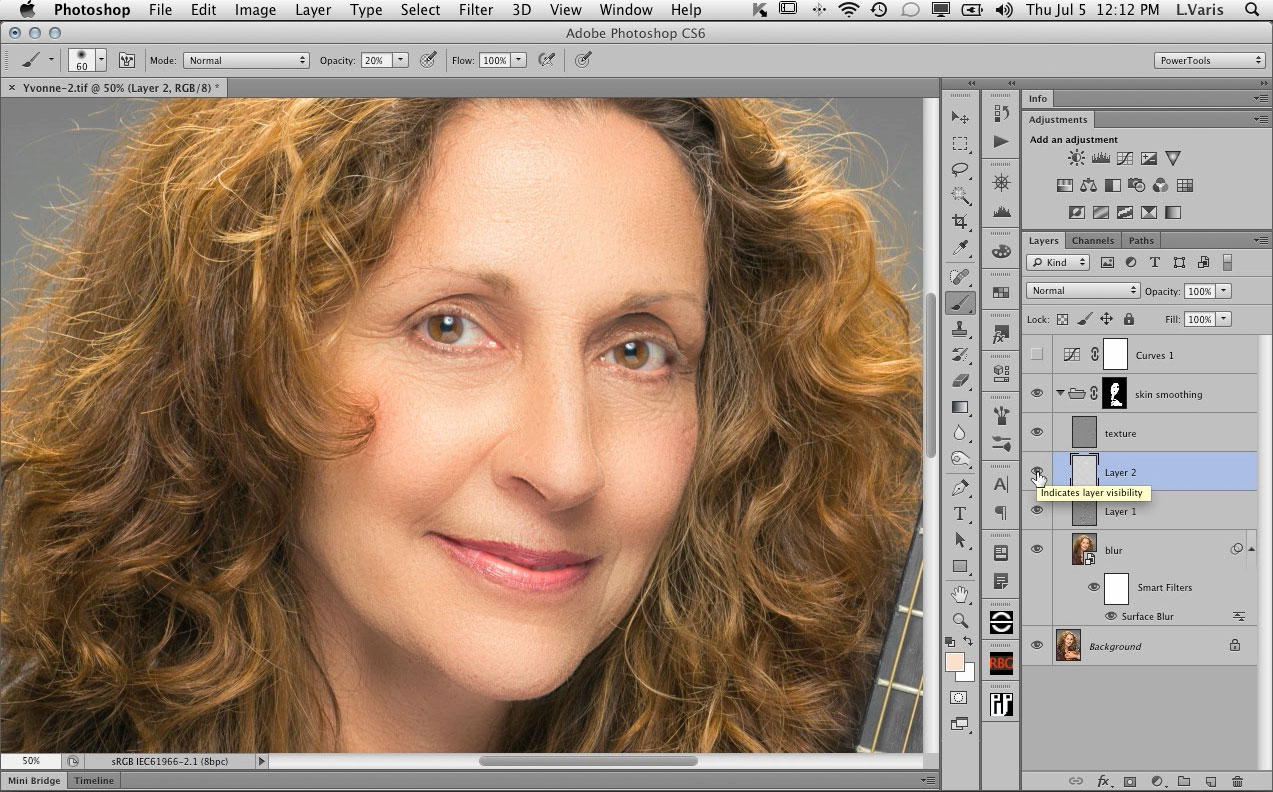
while I was in Italy, I had the good fortune to hang out with some amazing Photoshop experts. One of these was Alessandro Bernardi, who very kindly shared his version of advanced Frequency Separation retouching technique. I haven’t posted a video tutorial in a while so I thought I’d share this technique with you now:
This is a very flexible technique with a lot of variations. Alessandro will be putting together some advanced tutorials showing, for example, how this technique can be used to iron out wrinkles in clothing among other things. I will put links to these tutorials here, as they become available so check back in a couple of weeks!

Subscribe To My List
Join my mailing list to receive the latest news and updates about upcoming workshops, photo-tours, and tutorials

Dear Lee! You are like a treasure! I’ve learned a lot from you and your books. Many thanks!
After you changed the blur in the Smart Object “blur” layer, you forgot to do the Apply Image/Subtract-original step all over again from scratch in the “texture” layer. In other words, your “texture” layer still reflected use of the first regular Gaussian blur, and the 3-layer frequency separation stack before retouching wouldn’t be identical to the original. (And it showed!) Had you done so, wouldn’t you have been able to avoid all the masking completely? (I can’t think of a way to nest or combine Smart Objects to automatically update an Apply Image; not sure it’s possible, so you have to manually do the whole Apply Image step over.)
The texture layer is not a smart object it is a copy of the original background layer before making it a smart object.
The whole point is that the texture should reflect the fine frequency of the original image but the wider frequency color and overall shape of the smart object layer should get smoothed out with the subsequent Surface Blur…
Right, the blur layer was the Smart Object, but the texture layer never was made into a Smart Object. Read my post again; I’m saying that you did the Apply Image Subtract involving the first Gaussian blur to the texture layer, then changed the blur to Surface Blur but didn’t do the Apply Image operation again to reflect the new blur. That’s why the 3-layer stack before beginning retouching didn’t look like the original any more (like it did when reflecting the first Gaussian blur). You could have avoided all the masking completely, because the parts of the image you didn’t retouch would have remained the same, had the texture layer reflected the Surface blur. (Or did I miss something?)
I think you are missing the point – I want the texture layer to be different from the blur layer! The whole look of the smoothed skin depends on having a different level of blur between the texture (generated from the small gaussian blur) and the blur layer (re-blurred to a wider radius to smooth out the larger defects) – this effect delivers a nice glow, almost like doing extra makeup without having to do that much retouching. This is one variation of the basic frequency separation technique. If I did it your way and re-generated the texture layer, the texture would have been coarser, less attractive and would have require much more retouching!
There has to be a good reason to use frequency separation! Otherwise you simply end up with extra layers and have to do twice as much work as retouching on the one layer. The point is to use the differences to your advantage!
Ah, I see now — your frequency separation “mixed & matched” two different blurs on purpose, for reasons of your “extra makeup glow” (which made the masking worth it). Now that’s quite an innovation, sir! Thanks for the clarification.
Wow! That was amazing, way better than previous methods. Looks 100% natural.
Time to publish the 3rd edition of “Skin” book. Thanks a bunch again!
Its not in the movie that there is a difference between 8 bit and 16 bit pictures. If someone would try on a 16 bit picture, he/she will not get it.
Apply image has to be done with
invert checked
Blending: Add
Scale: 2
Offset: 128
As far as I can tell there is no difference between doing this in 8 bits vs doing it in 16 bits other than working with bigger file sizes. Besides, if you check the “invert” box in the Apply Image dialog for “Add” Blending, its exactly the same as “Subtract” without the invert!
I wouldn’t waste my time with 16bit files as it doesn’t really make a difference!
Sorry, I wrote this late in the evening, the right number for 16 bit are
invert checked
Blending: Add
Scale: 2
Offset: 0
16 is sometimes the better choice to avoid banding.
I concur with Lee that one can’t tell a visible difference between 8-bit and 16-bit in overwhelmingly most normal photographic images. (The difference is apparent practically only with images containing artificially-generated, mathematically-perfect vignettes.) There is, however, a pesky technical reason why the Apply Image has to be done differently for 8-bit and 16-bit images, and the problem falls on the Offset field: 50% gray in a 16-bit image cannot be expressed by an 8-bit number. 128 is an 8-bit number, so if you used the Apply Image settings with the 128 Offset with a 16-bit image, it wouldn’t be exactly 50% gray. So for 16-bit images you use the Add-Inverted, which, as Lee says, is the same as Subtract, BUT you’re avoiding the offending 128 in the Offset field with the zero instead.
What this Apply image maneuver does is put the difference between two images divided by 2 (“Scale 2”) situated so that a result of zero (black) gets shifted to 50% gray, which is the neutral value for the Linear Light blend mode. (Which is what makes the frequency separation layer stack involving the Linear Light blend, before retouching, perfectly identical with the original.) An image Add-inverted with itself already gives 50% gray, but an image Subtracted from itself needs the Offset of 128 to shift zero to 50% gray.
So why can’t you use the same 16-bit version Apply Image, Add, Invert, Scale 2, Offset 0 for an 8-bit image, too? Because the resulting “50% value” becomes 127, which messes-up the Linear Light neutral value. So we need two separate procedures for the two different bit-depths.
I’m with Lee: stick mostly with 8-bit images and Apple Image, Subtract, Scale 2, Offset 128.
It totally makes no difference in 8 or 16 bit image. First time I did it on a 16 bit and then on a 8 bit image and everything was the same. (I always work on 16 bit).
Just one little thing to add, for skins with strong texture, you should reduce the opacity of the overlay layer to 60-75 to get better result, otherwise the texture looks too contrast and kinda unnatural.
While not always immediately apparent with a quick glance in many images, you can demonstrate that there’s quite a difference if you do the 8-bit Apply Image procedure on a 16-bit image, and an even greater difference if you do the 16-bit method on an 8-bit image:
– With a 16-bit image, select 3rd layer (dupe of Background layer/original in Linear Light blend mode), Apply Image: 2nd layer (blurred), Add, Invert, Scale 2, Offset 0.
– option/alt-Merge Visible (to new, 4th layer). Disable eyeball visibility.
– Select 3rd layer (still in Linear Light mode), Apply Image: Background layer (original).
– Apply Image again: 2nd layer (same blurred), Subtract, Scale 2, Offset 128.
– option/alt-Merge Visible (to new, 4th layer, which pushes-up previous Merge Visible layer to 5th layer).
– Select 5th layer, enable eyeball visibility. Change Blend Mode to Difference.
– Merge-Down (Command/Ctrl-E).
– Auto Levels (Command/Ctrl-Shift-L) two or three times and you will see that the two Apply Image procedures are very different.
Repeat for an 8-bit image and you will see an even more pronounced difference.
George has already expertly explained why the two versions are different. In many images it would be hard to see, at a glance. This comparing technique really makes it obvious! The bottom line is that for this technique, with an appropriate photographic image, there is NO advantage to doing the this procedure in 16 bit. Really, I can’t think of any retouching that would benefit by being done in 16 bit. You can’t see whether there is going to be any banding benefit before you print in 16 bit because your monitor video card is only 8 bit anyway, unless you have a very high-end, $10k setup! It is much better to see banding on your monitor in 8 bit and fix it, in 8 bit, before you go to print, then to assume that 16 bits will protect you and find out later, after spending the money on separations, etc., that you have banding on the print anyway.
This particular technique doesn’t suffer from any exposure to banding issues! The texture layer would obscure any possible banding that could be introduced through the digital blurring of underlying layers!
@George
Thank you for your perfect explanation why on 16 bit the apply image has to be different than on 8 bit. Before I know it, but now I understand it.
@Lee
Maybe a missunderstanding. Of course the frequenzy split leads to same results on 8 and 16 bit, but high end retouches, for different reasons, are done in 16 bit, and if necessary the conversion to 8 bit is done after finishing the workflow.
Is this something that can be boiled down to a 2-minute retouch, for working a batch of images, or is this only something you would do on 2 or 3 select images?
This is a very flexible technique! You can do a very quick & sloppy version that will deliver a reasonable pleasing result and use it to prep many images—the setup can be made into an action— but you’d still need to brush over the skin. Or… you can spend a bit more time carefully retouching the texture and blurring the skin for a more refined “invisible” look. The applications are many and varied!
I’m looking forward to your Creative Live series of webinars that starts Thursday!! — any hints or leaks of some of the material you’ll be presenting?
Maybe you should give people a link to your Creative Live sessions???
I will be examining my photography workflow in detail with three different subjects——lighting, shooting and retouching a dark skinned male subject (low key dramatic), a fair skinned female (beauty portrait) and an athletic dancer (action shot) —— I will be cover color correction, luminosity blending, skin smoothing and retouching! People can register for free here:
http://www.creativelive.com/courses/skin-lighting-shooting-retouching-lee-varis
Thanks!! — I’m looking forward to watching it live online as you present your classes. Good luck and ‘break-a-leg…”
I still think you should look into teaching some seminars/workshops at the Rocky Mountain School of Photography (www.rmsp.com) if your schedule has any openings.
jb