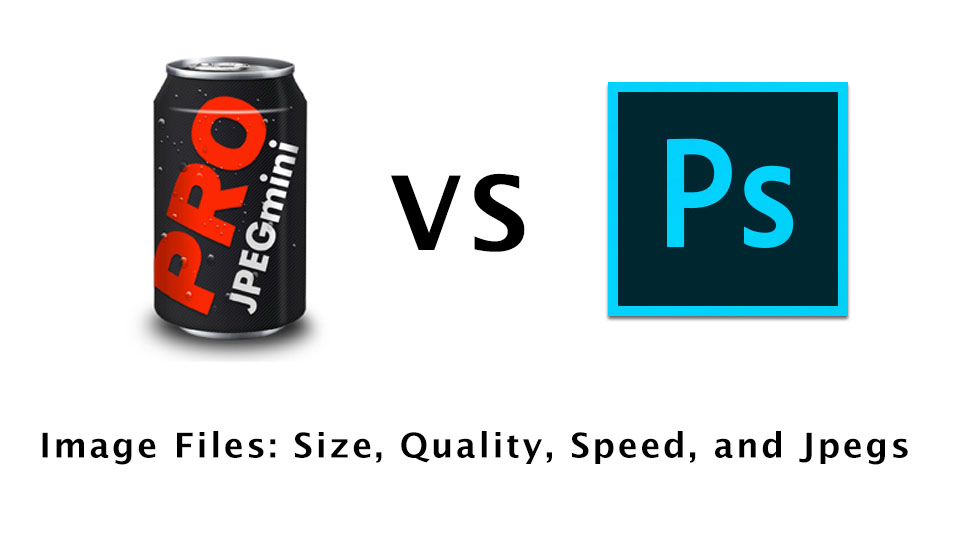
The search for the ideal Jpeg leads to…JPEGmini?
This is going to be a long post… sorry about that! I’m trying to avoid a simple opinion review, or a review that says something along the lines of “Check out this cool product!” While not as thorough as an Imaging Resource camera review, I thought I’d share a detailed example of how I go about testing a software product, and maybe you can glean some basic testing strategies for your own use out of it.
JPEGmini comes as a stand-alone app & as plugins for Photoshop & Lightroom.
I was recently invited to test out a new software, plugin and stand-alone, for generating jpegs. Yes… someone decided that what the world really needs is another way to generate jpegs, one that doesn’t suck! Well… nothing really wrong with that idea, other than the part that jpegs suck… but I’m getting ahead of myself here. Why shouldn’t there be a better jpeg? Of course there already is a superior image compression format—its available inside Photoshop, no less, and its called jpeg 2000 (because it was invented way back in the year 2000.) Unfortunately, jpeg 2000 is largely ignored by just about everyone. The plain-Jane jpeg is still the format of choice when it comes to photographic images on the internet. Its kind of like VHS vs Betamax (millennials should Google this) – a basically inferior method of compression stays in use simply because everyone is already using it, thank you very much! Can we make a better jpeg using the exact same standard, so that it is easily integrated into your workflow, and still universally accepted?
Well along comes JEPEGmini with just that promise! JPEGmini claims to reduce the size of the image, faster, with better quality than you can using a normal Photoshop centric workflow. Actually, combing over their website, they scrupulously avoid making that exact claim, but that is certainly the implication, and at $29 for the base version, it seems like a relatively low cost for the benefit. Of course there are a pro version at $99, and a “server” version for $199/month…much more expensive for additional workflow benefits. So what’s a self respecting photo-guru supposed to do? Test it for themselves, of course!
So… after this long-winded introduction, the rest of this post dives into a detailed analysis of just what this software does…
Spoiler for those impatient readers
OK, so before I go too far, this is what I found out! JPEGmini works for what it is really designed to do—however, what it really does is not very clear on their website, or in their advertising. The software, either as a plugin for Photoshop or Lightroom, or a stand-alone app, applies some image analysis to determine whether a given jpeg can be compressed further without visible degradation, and if it can, it applies a higher level of jpeg compression to make the image file smaller on disk! Thats it… There is no secret sauce jpeg magic that gives you better jpegs at a given size. These are the same standard jpegs you can get out of Lightroom or Photoshop—it just makes a determination about how much compression to apply without user intervention! Whether that is of any particular use to you is another issue altogether!
The implication of the JPEGmini website is that this software somehow makes better jpegs, and that is what I thought I was trying to find out! In the end I managed to separate marketing spin from real world utility that I hope gives you some idea about the complexity of the issues of truth in advertising. Anyway… lets get started…
We begin with a simple test—Lets save a Jpeg!

This image was captured during our last photo tour of Venice for Carnival – Fujifilm GFX, 8256×6192 pixels, a 28meg camera jpeg file!
The image above is from a Fujifilm GFX, and the in-camera jpeg is 28 megs—just the sort of image file that I’d like to reduce in size without harming. JEPEGmini comes in a standalone version, as well as plugins for Photoshop and Lightroom. Since I want to test JPEGmini against Photoshop, I’ll start with the Photoshop Plugin. I will save out a level 12 jpeg through Photoshop, and then a JPEGmini version through the plugin…
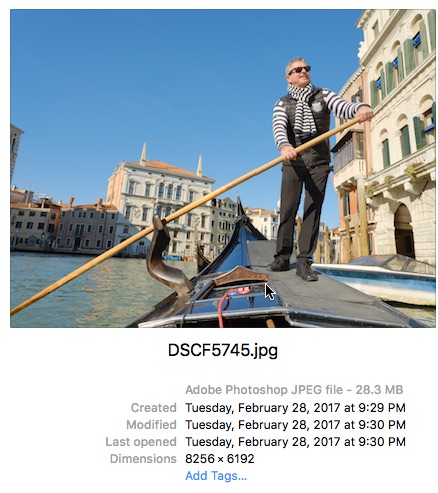
Screenshot from the camera original jpeg showing the file size on disk – 28.3 megs

Here is the Photoshop max quality jpeg level 12, size on disk: 34 megs
The maximum quality setting of Photoshop actually swells the size of the file to 34 megs!

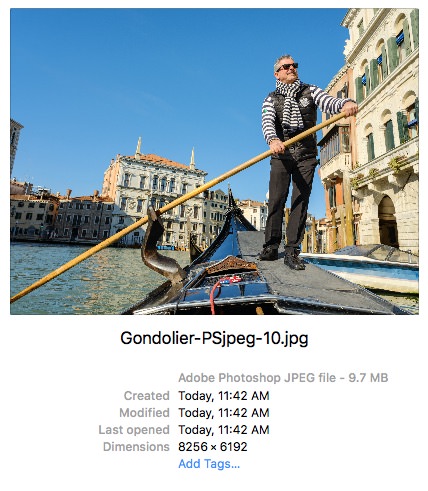
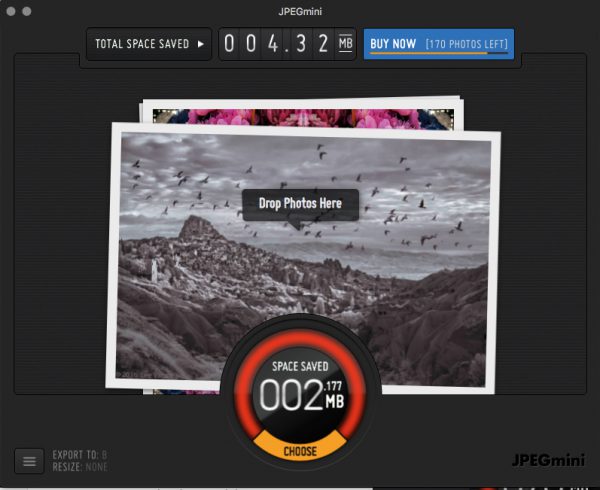
JPEGmini has no “settings” – just one default for quality and compression – delivering a 10.6 meg file
Well, at first glance it seems like JPEGmini is a winner, delivering a smaller file as promised. However, Photoshop does not just have one setting for file size and compression, but a full range of settings from 1 – 12… the lower the number, the more compression and smaller the file size. So… lets see what happens with a Photoshop setting of 10…
Photoshop level-10 jpeg delivers a 9.6 meg file
Hmm… so it does not seem that there is any obvious difference in quality between these 3 files, even when examining them at 200% magnification. The best way to test for a difference is using Photoshop’s “Difference” layer blend mode—so I drag the Photoshop level 10 Jpeg, which is close to the same size as the JPEGmini, on top of the camera original Jpeg, since this represents the best version of the file, only compressed once in-camera. Change the layer blend mode to “Difference” and we get…

Nothing to see here…
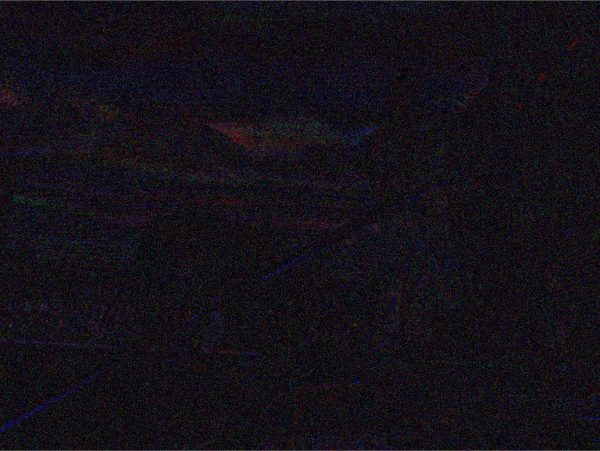
The “Difference” blend mode shows any differences by displaying pixel brightnesses relative to black—no difference will yield a black pixel… clearly there is not a great deal of visible difference here, so we need to accentuate it to get a feel for the relative differences between the Photoshop jpeg and the JPEGmini jpeg. The key is to place a curves adjustment on top of everything that creates maximum contrast…

Drag the white point over, all the way to the left to create maximum contrast in all the channels.
To do that I drag the white end-point over, all the way to the left so that the curve simply hugs the left edge of the grid. Any deviation of pixel value in any channel will show up as a white pixel in any channel that shows a difference at that pixel…
small differences show up as brighter red, green or blue pixels…This image accentuates the difference between the camera original Jpeg and the Photoshop level-10 jpeg!
You will need to do this test yourself, and zoom into 100% to see the actual distribution of different pixels, but the overview above gives you some idea—not a lot of visible difference, but there is definitely some change in the pixels, and we’d have to interpret that as compression artifacts! So what does the JPEGmini version look like?
Accentuating the difference between the JPEGmini version and the camera original jpeg. Here there seems to be slightly more difference—you’ll probably need to take my word for it because it may not be clear on the web.
The JPEGmini version actually seems a little worse—the difference is slightly more noticeable—again, you’d have to do an actual test to really see this! There is no telling how this might look in the web browser here. The interesting thing is that the Photoshop level-10 version is slightly smaller that the JPEGmini version, but it seems to have better image quality! At the very least, this does not indicate any particular advantage for JPEGmini over Photoshop!
OK, but can we see any difference without doing such an extreme test? Let’s take a look at an area under high magnification and see…
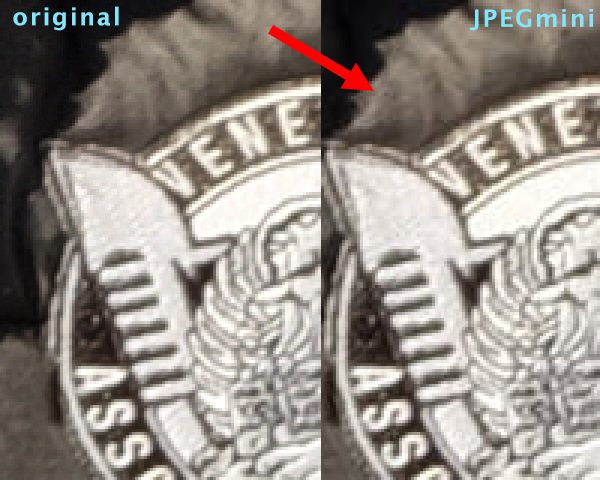
A magnification of 300%—Look at the area indicated by the arrow, and you can see “block” artifacts compared to the camera original jpeg.
We are looking at a part of the logo on the gondolier’s vest at a magnification of 300%. Usually Jpeg artifacts show up around edges as extra noise or little lines. If you look very closely here where the arrow is pointing, you can see “block” artifacts where smoothing has occurred in 8×8 blocks—you can see little lines defining the blocks. Again, this may be hard to see in a web browser, but they are definitely there in the JPEGmini version.
No visible difference is seen between the Photoshop level-12 version and the original camera Jpeg
As expected, the Photoshop level-12 jpeg look basically identical—it is actually larger than the camera original jpeg, so that makes sense. But how about a level-9 jpeg ?

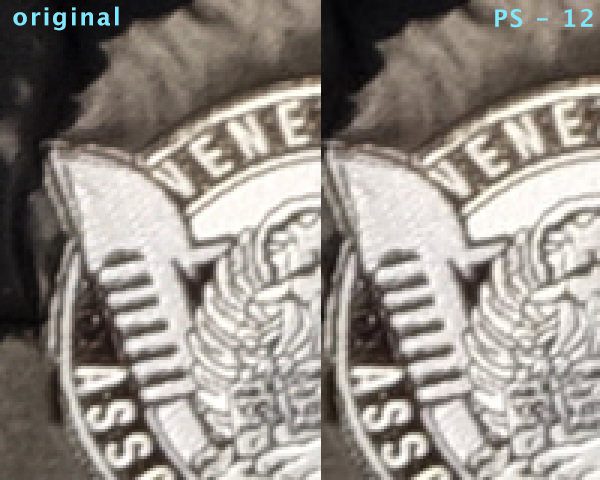
This is a 6.5 meg file, quite a bit smaller than the JPEGmini version, and it doesn’t show the same level of “block” artifacts!
Well… this is interesting, because the Photoshop level 9 jpeg is only 6.5 megs vs 10.6 for the JPEGmini version, and it looks better… no visible “block” artifacts, and we are hard pressed to see any loss in detail or texture! To be sure this level of artifacting is just barely visible at 300%—nobody could see this at normal sizes in any type of output, so no problems with either jpeg, still… the Photoshop jpeg looks better, the “Difference” test is better, and its smaller!
Right now its looking like there is absolutely no advantage in using JPEGmini over the regular save-as-jpeg inside Photoshop. Photoshop offers way more control over quality and size settings, it can be turned into an action and automated with a droplet, so if you own Photoshop, you don’t need JPEGmini… The standalone application may offer some advantages for batch processing to get smaller Jpegs, especially if you don’t own (or subscribe to) a version of Photoshop, but the standalone application only processes jpegs—it will not work with Tiffs or Psds or any other bit map file format for that matter.
Whenever anyone makes qualitative claims for image processing software, you have to test things for yourself, think in terms of an experiment with a control test—you have to have some kind of baseline to compare against. You also have to test with more than a single sample or you fall victim to sample bias, where an exceptional sample skews your results and leads to a hasty conclusion. Since this post is already getting long, I will not bore you with the details of my other tests.
I tested saving Jpegs out of Lightroom against the JPEGmini Lightroom plugin with similar results. I tested portrait images, landscape images, dark images, light images, and I tested everything through the plugins and the stand-alone app. Nowhere could I find any instance where JPEGmini did a better job of jpeg compression, in quality vs file size, than simply setting Photoshop at a level-10 jpeg for a hi-res image, and checking the “Baseline Optimized” checkbox!
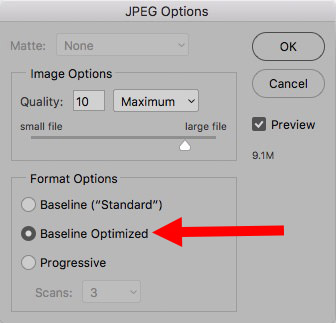
Checking “Baseline Optimized” will shrink the file size slightly without introducing any more artifacts than would occur anyway at the selected quality setting
The situation is a little less clear with low res images intended for the web!
Here is a quote from the JPEGmini website that talks about the technology behind the JPEGmini version of jpeg image compression:
“JPEGmini technology has two main components: The first is an image quality detector, which imitates the perceptual qualities of the human visual system, to determine the maximum amount of compression which can be applied to each individual photo without causing visible artifacts. The second is a unique JPEG encoder, which adapts the JPEG encoding process to the original photos, creating the most compact representation of the photos that is possible under the JPEG standard.”
Well… the last phrase in that last sentence may be a bit of a stretch, but what they are really claiming is that JPEGmini applies some kind of image analysis to decide what level of compression to apply, so that the user doesn’t need to make a decision about what level of jpeg compression to apply! This may have implications for batch processing of lo-res images destined for the web!
The lowest cost version (at $29) of JPEGmini is the stand-alone app, called simply “JPEGmini”—”JPEGmiini Pro includes the Photoshop and Lightroom Plugins! The stand-alone app is a fairly basic batch processor. The interesting thing about the stand-alone app is that it only works with Jpegs, and it will refuse to process if it cannot make the file smaller.
The JPEGmini stand-alone app is designed as a convenient batch processor.
The JPEGmini Pro application is a very convenient batch processor. You simply drag and drop as many jpeg files as you like onto the drop area and the app churns out jpegs or supplies a report saying no photos were optimized…
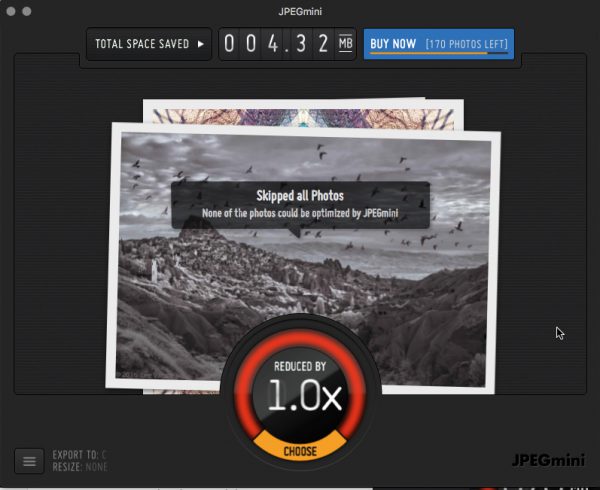
If JPEGmini cannot make the files any smaller than they already are, it returns a message stating none of the photos could be optimized.
If only some of the photos were optimized, it doesn’t tell you which ones were or not
However, if only some of the photos were optimized, it doesn’t tell you which ones were or not, and simply duplicates non-optimized ones along with optimized ones. There is a relatively unhelpful running tally of total space savings that just keeps climbing with every batch at the top of the interface. As far as I can tell, the application is testing for file size reduction against the total size of all the files dropped on it instead of on a case-by-case instance, and whether it processes an image or not, is based on the level of jpeg compression already present in the jpeg file. There are no preference settings for image quality or file size reduction—supposedly there is some sort of A.I. image analysis applied to determine what level of compression can safely be applied, but just how intelligent that is remains to be proven.
It seems that the image analysis is trying to determine if the jpeg image has reached the point where any more compression will introduce visible artifacts, and if not it will re-compress to make the image smaller. I ran iterative tests to see what happened with sets of successively smaller jpegs compressed in Photoshop—level-10, level-8, level-6. At level-10 & level-8, JPEGmini found a subset of the total images that could be compressed further. At level-10, about 50% could be further optimized, at level-8, about 25% could be… and at level-6, it couldn’t find any that could be further optimized, so it refused to process the batch. What is interesting is that Photoshop always generated a smaller jpeg at higher compression settings with every image, but even at Level-6, I still could not “see” any visible artifacts in all but a few sunset sky images! JPEGmini optimized 50% of the images at Photoshop’s Level-10 setting—compressing the files further by a small amount. The 25% that it found at Level-8, were optimized to a slightly smaller size than the same images that were optimized at level-10…??? At the two levels it found images out of the batch that it could optimize further, it simply duplicated the images that it couldn’t optimize. I think that one is expected to just overwrite the originals in the batch, because the default option is to do just that…
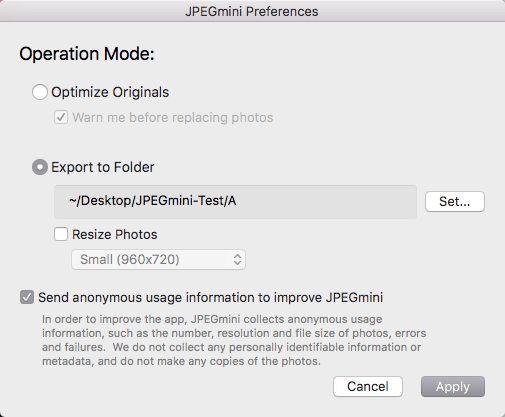
The default operation mode for JPEGmini is set to “Optimize Originals”. I chose to Export to Folder for my tests so I could compare file sizes.
You can re-size images in a batch with pre-set sizes or a custom size…
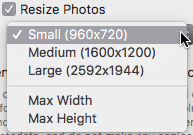
re-sizing options are displayed in a drop down menu.
It seems like JPEGmini could be used in a mindless batch process pretty successfully to apply different levels of compression based on image content, and generate fairly conservative levels of image compression that would not show any visible artifacts, but to achieve maximum compression, you may be better off simply applying Photoshop jpeg compression at a level-6, and then checking to see if there are any that show degradation—then re-compress just those images with a higher quality setting. In many instances, I have found that for web-res photographic images, even level-4 jpegs can look just fine!
The one caveat here is in images where there are subtle gradients, and this is where JPEGmini can show some intelligence by refusing to compress these images at the same level as others—this could save you some time in the long run!
I really wish JPEGmini had some sort of preference settings for size vs quality, where the user could indicate what was most important for their particular needs—that would make it much more useful !
Conclusion…
So… the conclusion here is that JPEGmini basically does what it says it does, but doesn’t provide any special benefit over other methods of jpeg processing readily available to most photographers or graphics professionals. The stand-alone app can be purchased by itself for $29, and it might have some utility for a web designer working with hundreds of images for a massive website. Its hard to imagine why such a person wouldn’t already have Photoshop, which can be set up with actions, batches, and droplets to achieve the same level of automation, with more control and better results, if one is willing to make some decisions based on image content. However, to be fair, it does seem like JPEGmini is primarily designed for batch processing of large sets of images that one can’t be bothered with checking individually! The Pro version includes the Plugins for Photoshop and Lightroom, but again, as demonstrated by my tests, and certainly at an asking price of $99, it just doesn’t seem to be worth it.
The adage “buyer beware” applies all of the time—do your own tests before committing to a purchase. Manufacturers of products rely on buyer’s laziness, and most often supply reviews touting the benefits of their product, knowing full well that people will not even read a review carefully, so any conclusion arrived at will be seen as true, even when the testing methodology is flawed. Although I feel like I’ve tested JPEGmini thoroughly enough to draw some conclusions for myself, it is more than possible that someone else can have a different experience! This is the thing though—for a simple image processing product, designed to do one thing, it should provide some kind of obvious advantage, for that one thing, when compared to the Swiss Army Knife product that does a wide range of things! JPEGmini should have demonstrably better results, one way or another, than Photoshop or Lightroom by themselves—my tests don’t show any special advantages in either file size or quality. As it turns out, that is not what JPEGmini actually does—its an image analysis tool designed to determine if a given jpeg can be further compressed without visual degradation—if that is of any interest to you, you might consider the stand-alone JPEGmini at $29
At the end of the day, jpeg file compression is a very well understood standard, and frankly, the files resulting from even medium quality Jpegs are not that bad.
I once did a series of tests for a large commercial photo lab to test the viability of pushing jpegs through the local network instead of Tiffs to save rip time on large format prints. We made several sets of identical 40×60 prints using Photoshop Jpeg, level-8 (the first level designated as “high”) compared to an uncompressed tiff . We then had people try to decide which was which—most people wouldn’t even hazard a guess because they couldn’t see a difference. Those that did guess were wrong 50% of the time, randomly selecting the jpeg or tiff from different images. In the end we settled on using Jpeg level-11, just to be sure, and nobody ever knew the difference, but it made a huge difference for our workflow, cutting down the transfer time through the rip network by a factor of at least 10.
Final Conclusion
So… if you’re looking for file size reduction while still maintaining highest quality, Photoshop or Lightroom is perfectly adequate—if it doesn’t seem small enough, just apply a lower quality setting, and be happy. The resulting artifacts are just as invisible using Photoshop/Lightroom, without resorting to JPEGmini. If you routinely batch process large numbers of images destined for web pages, where minimum size with good quality is important, AND you do not have time to make image content decisions to determine compression settings yourself—JPEGmini (the basic version at $29) might be just the thing you are looking for!
I think it would be nice if the JPEGmini people made the purpose of the product more clear on their website, but then more people wouldn’t purchase it, and I probably wouldn’t have bothered testing it so thoroughly—I’ve never found an automatic way of doing anything that ended up being better than what a human, with a modicum of intelligence, could do on their own.