Its been way too long since I posted a new tutorial, so to usher in the new year, I submit this step-by-step video on using Lab channels as the source for luminosity masks. This type of masking is all the rage right now, and you can find many tutorials about the general procedure all over the internet. There are even action that automatically generate multiple, mostly useless, layers with contrast variations in masks from the RGB channels. My humble offering here is a bit different in that I show how to use a mask generated from the “b” channel of Lab, to isolate a subject based on color rather than tone!
Here is my base image:

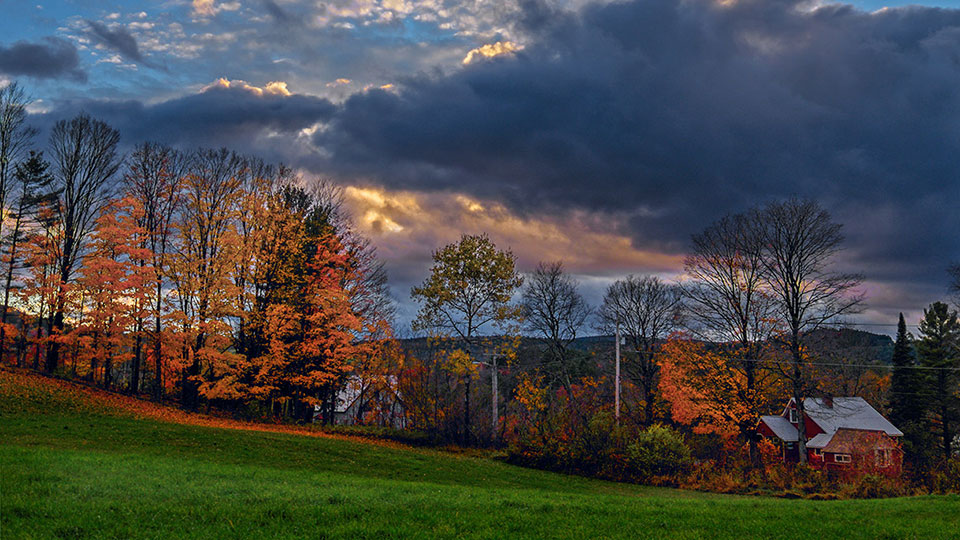
Starting point from a shot done in Vermont this past fall
This exposure works overall, especially for the sky! The mood is about what I want, though is is a bit under exposed for the trees and houses. Fortunately I made another exposure for the foreground:

The lighter exposure works for the trees, but detail in the sky is lost.
Now… I could do a simple blend with a soft layer mask, replacing the dark foreground with the lighter exposure, but the result would have the sky directly behind the trees too bright. Using, say, the blue channel to generate a mask would provide a very detailed mask for the entire foreground, but it ends up being very difficult to keep from showing light halos around all the little tree branches—here’s what a blue channel mask would look like:

Blue Channel Mask.
At first glance, this looks like it would be an ideal solution, but the result looks fake!

Combined version looks fake – too washed out… somethings not right.
A close up shows that the bare tree branches have a subtle washed out look – manually editing the mask just makes everything worse!

A Close up of the file shows weirdly washed out tree branches against the sky.
I decided that what I really wanted, was to isolate the yellow and red leaves of the trees, and let the tree branches go dark. This may seem like a difficult task, and it certainly would be, if I were to look for a starting place in the RGB channels. But by making a copy in Lab, it becomes very simple to end up with a mask that does exactly what I want. Additionally, editing the color in Lab gives me a great way to enhance the saturation and color of the leaves that really enhances the image – here’s the final result:

The final result has just the right sunset mood with the bright fall colors and red brick of the house enhanced.
I prepared a video showing the complete step-by-step process with a little bonus on selective sharpening that I think you will find useful, here:


Brilliant and much friendlier approach. I appreciate you and what you share with us. 🙂
After listening three times, I think I got it. Thank you Lee, very helpful, and well done.
I tried the technique and it seems to work very well indeed. But of all the luminosity tutorials I have seen I have yet to see one with more than 2 exposures. In some instances more than 2 are needed. Is it possible to use more than 2.
Yes, you can certainly use more than two if you have specific areas in the image that require it. At some point though, it becomes easier to simply do an HDR. I would say, if you need more than 3 exposures to cover the dynamic range, then you’re probably better off shooting for HDR, and processing to an 32bit HDR file.
Thank You.
Your a great educator!!!Thank you…