Creating the Ideal Twilight Moment in Architecture Photography
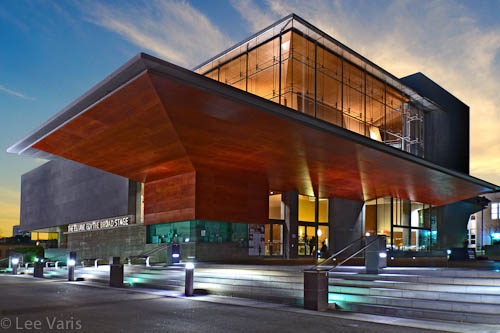
I recently had an assignment to do some architectural photography for Santa Monica College. Part of the assignment was to get a good shot of the swank Eli and Edythe Broad Stage which is a little known showcase building connected to the college. I planned to shoot the building before a performance and as part of the deal I would get to attend a performance of the Merchant of Venice starring F. Murray Abraham. The evening of the performance I arrived early and setup my tripod to get a shot of the building in the magic hour right after the sun set. Well… as is the case most of the time, magic hour did not cooperate! The sky looked great but the building exterior lights had not come on yet and there was too much difference between the brightness range of the building and the intensity of the sky. Before you jump to the conclusion that this is a job for HDR remember that the lights of the building had not come on yet. Now I could have waited until the lights came on to capture additional shots for an HDR bracket but the performance was going to start and… well, I wanted to see the performance – what to do?
The solution required two shots but I couldn’t leave my camera unattended in the parking lot while I was inside watching the performance. So… I marked the position of the tripod with tape where the feet were and folded it up with the ballhead still locked down in the same position. I put the tripod in the trunk of the car,took the camera with me and went to the show! After the show, I retrieved the tripod and set it up where the tape marked the feet. The position was not exactly the same but it was close enough that I could place the two shots into layers and align them in Photoshop. I was hoping that I could use the new “Auto-Align Layers” feature in Photoshop but the two images were not recognized as similar enough for Photoshop to do anything intelligent. So… I had to align the two layers manually. This is not as hard as it might seem. The trick is to change the blending mode for the top layer to difference. You can then easily see where the layers are out of alignment and adjust the position with pixel level accuracy. The only real challenge, in this case, was that the top layer needed to be rotated and that always makes it harder.
I managed to get things lined up and then it was a relatively simple matter to mask the elements together. Why didn’t I shoot a full HDR bracket? It wasn’t really necessary – there were only two good exposures possible and the two areas were very well isolated with respect to the lighting. This traditional, two shot approach was the norm when shooting film and often the photographer achieved the blend by double exposing onto one sheet of 4×5 film. Digital capture afforded me the luxury of attending the performance and blending the two shots later in Photoshop.
To finish it off I had to do a bit of lens correction distortion in Photshop to bring the sides of the building into parallel – this is a convention in architectural photography that was originally achieved in-camera by tilting and shifting the lens board and back of the view camera. I didn’t have a tilt/shift lens with me and I doubt I could have gotten far enough away from the building to get the whole thing in the shot even if I used the 24mm tilt/shift. As it was, I had to use a 16-35 zoom at 16mm with my Canon 1DS mk2 to frame up the shot. The detail held up quite well even after I used extreme lens correction.
I’ve posted some other architectural shots of the Santa Monica College campus here.
By the way, the performance was fantastic!




Fabulous shot and good clear tutorial, thanks Lee.