A Few Power User Tools for Serious Image Enhancing
I am usually not big on filters or commercially available “Action” sets for Photoshop—I prefer to “roll my own”—I spend most of my time showing people how to get the most out of Photoshop by using the built-in capabilities of the application. There are, of course, many very useful filters, the various NIK filters come to mind; these mini-applications can simplify your workflow or extend the capabilities of Photoshop. Most of the time, however, Photoshop, all by itself, is all that you need if you know how to use it effectively. I also think that the 3rd party Photoshop filters and extensions become more valuable when you know more about how to use Photoshop in general.
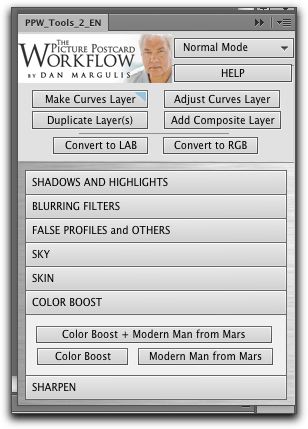
All that being said, I do use filters and extensions and I thought I’d share some less common extensions that are aimed at the more advanced user. First up, the grandaddy of all advanced Photoshop extensions is Dan Margulis’ Picture Postcard Workflow panel:

The PPW panel is designed to automate some of the more complicated techniques of Dan Margulis’ color correction methods.
This custom panel organizes a number of actions that automate the complicated, multi-step techniques associated with Dan Margulis’ image enhancement workflow. Like all the “tools” I will be discussing here, panels are installed into Photoshop as extensions. PPW Tools can be downloaded free from Dan’s page on Sterling Ledet’s website. I comes with an installer that places everything in the right place for Photoshop. Once installed, like any other custom panel, it can be accessed from the Extensions submenu: Window-> Extensions-> PPW_Tools_2_EN
The panel can be docked with other panels so it can be available for use quickly. Click on the “Help” button and you get another window where you can find instructions.
The documentation is very good, but the Workflow is perhaps only understandable if you have taken one of Dan’s classes or watched his tutorials on the Kelby Training website. My own 10-Channel Workflow is based on Dan’s Picture Postcard Workflow and I will sometimes use elements from this panel when I’m in a hurry. The sharpening component of the panel is especially useful as it automates a very complex series of steps to achieve a flexible set of sharpening layers but leaves all the layers intact. A number of the actions available from the buttons of the panel deliver a prompt at the beginning to ask whether you want to duplicate the document and work on a copy:
At the moment, the Picture Postcard Workflow Tools is available for free, but even if it cost $50 it would be a bargain! This is one of the best engineered action panels available for Photoshop and every serious image worker owes it to themselves to learn how to use it.
Dan’s panel was developed with his guidance by an Italian team of programers: Giuliana Abbiati, Alessandro Bernardi, and Marco Olivotto. Giuliana has a few other panels available including Channels Power Tool:
This panel makes applying grayscale channels as masks easier, essentially bypassing the complex Apply Image dialog in Photoshop. The panel supplies actions for previewing, applying and manipulating channels. Channel luminosity is a major component of my 10-Channel Workflow and this tool simplifies some of the techniques in a very elegant package. There is extensive documentation built into the panel to provide instruction on the use of the panel – click on Doc & More at the bottom of the panel. The “Generate Preview” button builds a proof sheet document with thumbnail versions of the 10 channels: L,a,b, R,G,B, & C,M,Y,K

Generate Preview is a great aid in visualizing the possible channels for consideration before having to commit to a mode change.
This makes it easier to compare and look for a particular channel to use in mask generation or blending. Again, this is an advanced tool for power users, not a one-click effect generator. I find it useful but it certainly doesn’t replace the need for comprehensive understanding of Photoshop image processing. This panel is not free, but at 20 euro, it is reasonably priced for such a useful tool.
One last tool worth mentioning is Davide Barranca’s ALCE or Advanced Local Contrast Enhancer – this is a one-trick pony panel with a very simple control to enhance local contrast in a way that is similar to the High Pass Overlay technique. This panel automates a more complex action that generates a better result than High Pass + Overlay and makes it easy to get a 3D shaping effect in your image.
ALCE creates an effect similar to the Clarity slider in Adobe Camera Raw with less obvious halos. After you start using ALCE, you really appreciate the ease with which you can create this particular detail enhancing effect. There is extensive documentation along with numerous video tutorials on how to use the effect on the web page.
Giuliana And Davide are part of the RBG (Robert Beganno Group) group – you can find two interesting “freeware” panels on their page which is part of the RBG blogsite.
As I already mentioned, these tools are no replacement for comprehensive knowledge of the inner working of Photoshop, but they can speed up your work by simplifying a complex series of moves in Photoshop and the more you understand about advanced Photoshop techniques, the more valuable the panels become.
