Lee Varis shares some panorama insights in Florence
Well… the dust has settled, somewhat, from my trip to Italy, and now begins the long process of evaluating the thousands of images captured during my tour of Tuscany. Our first stop after Rome was the incredible city of Florence, arguably the most important city of the Italian renaissance. I took a lot of panoramas of the amazing architecture and street life of the beautiful city, and I thought I would share a few interesting discoveries about hand held panorama technique with you. Multi-shot panos were very necessary, as the streets are very narrow, and you are often standing way too close to the buildings to capture everything in one shot.
I covered some techniques for un-distorting “bent” panoramas using “Puppet Warp” in my post from Death Valley here: 2012/04/17/death-valley-adventure – this time I will have to use a different approach using a very old “Distort” filter.
I shot a pano series of the Basilica di Santa Maria del Fiore or the “Duomo,” with the “Bapistry” or Battistero di San Giovanni on the right. After merging into a panorama in Photoshop the result shows an all too typical bend that is the result of Photoshop’s attempt to correct for geometric distortion:
I have had good luck dealing with this issue using “Puppet Warp,” but in this case, it is very hard to push the image into shape without rippling the straight lines in the buildings. Fortunately, I found another solution using the “Shear” filter. This old-school distortion filter has been in Photoshop since the very first version, and it hasn’t been updated at all in the many years since its introduction. However, despite the relatively primitive interface, this simple filter is perfect for solving this particular issue.
First, after merging the layers, rotate the image 90° using: Image->Image Rotation->Rotate 90°CCW: Then, select Filter->Distort->Shear…
You will then be presented with the tiny thumbnail window that was typical of Photoshop versions prior to PS4:
The idea here is to use the graph “line” to bend the image opposite to the bend of the horizon. Its is necessary to rotate the image before running the filter because the “line” is only oriented vertically. Place a point in the middle of the line by clicking and then push it to the left while observing the tiny thumbnail. I also pushed the two end points to hep straighten the horizon without pushing the image out of crop! You will probably have to re-do this a couple of times before you get the right amount of counter-bend because its hard to see what’s going on in the tiny preview.
After running the filter rotate the image back (90°CW) and use Free Transform to correct for perspective.
Once you get into the Free Transform tool (Edit->Free Transform…) control or right-click inside the image to convert to “Distort”—this allows you to freely pull the corners and stretch the image out to achieve the appropriate perspective correction.
After a trip into Lab and a little “10-Channel Workflow” technique, I arrived at this:
You can see a detailed presentation of the “10-Channel Workflow,” using a landscape image, in a video tutorial here: 10-Channel Workflow
The Baptistry
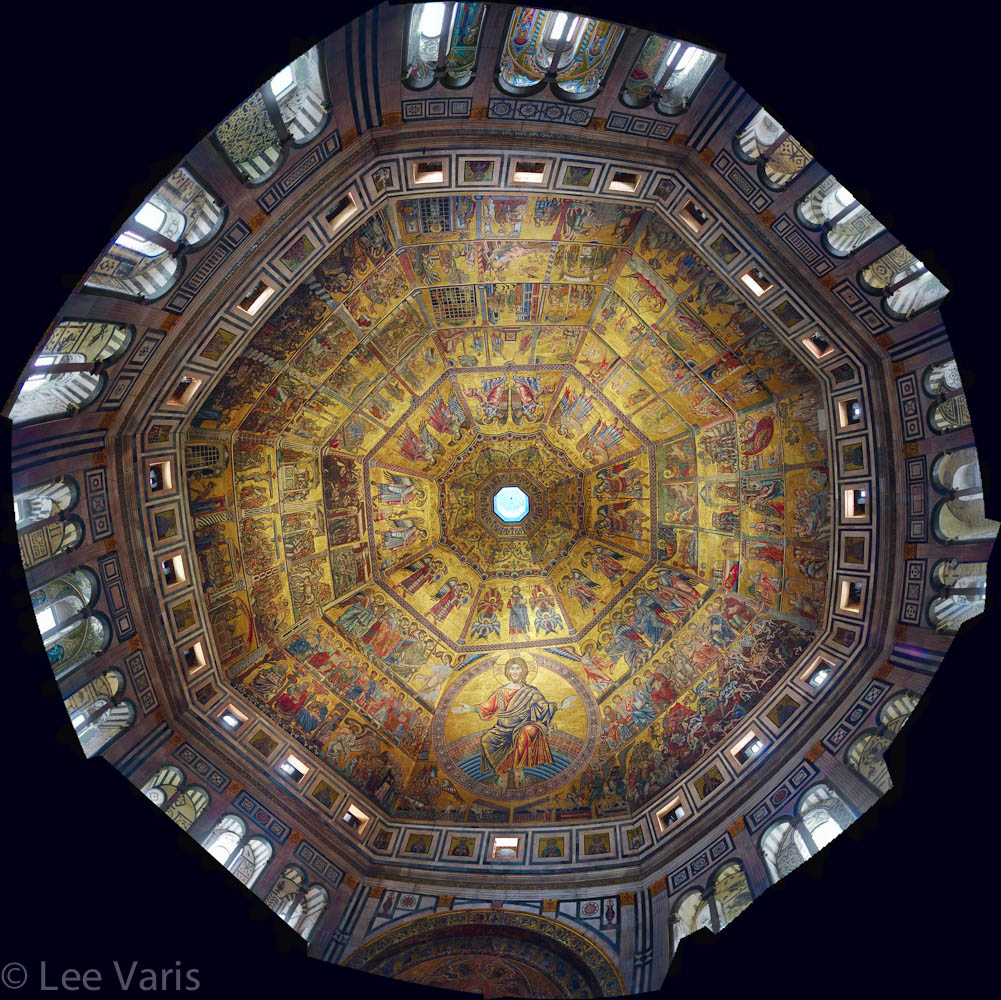
There is one more interesting panorama discovery I’d like to share. This one involves the interior of the Baptistry, specifically the dome ceiling. I shot an 8 image sequence of the incredible hexagonal gold leaf ceiling—all hand held—as they don’t allow tripods inside any of the churches or museums. Each individual shot captured one hexagonal section like this:
I stood at the center of the floor shooting up to center one of the sections horizontally in the frame. I would then rotate such that the next section occupied roughly the same spot in the frame. Rotate-shoot, rotate-shoot, until I had all of the sections shot. I thought that Photoshop might be able to automatically align each of the sections into a seamless composite of the whole ceiling, but I had never tried this before, and I’ve never seen anyone else do something similar.
So… crossing my fingers, I selected the sequence and went into Photomerge, and without too much drama, this is the result:

The resulting composite is not really a panorama but is amazingly good for hand held shots auto-aligned.
Pretty cool for a white guy without a tripod !
The final file is very high res with incredible detail. I shot this with the new Fuji X-pro and I was very pleased with the sharpness of the image, shot at high ISO under low light, hand held. I’ll have a more complete review of my shooting experiences with the Fuji x-pro in a future blog post. For now, I’d like to leave you with the thought that you can achieve great wide angle shots even if you don’t have a wide enough lens by shooting multiple shots and blending them together in Photoshop with Photomerge!

Subscribe To My List
Join my mailing list to receive the latest news and updates about upcoming workshops, photo-tours, and tutorials








Lee, I like your blog notes very much, and I would like to attempt some of the processes you have written about, so I’m wondering if you have ever published any of your instructional material in PDF form?
I very much enjoy looking at your pictures and the steps you take to arrive at a conclusion.
David Crandall
You can find some PDF tutorials on my website: https://varis.com/pdf-tutorials.html