Working HDR before, During, and After Tone Mapping
I often refer to HDR, or high dynamic range imaging, as the fine art of cheating, but while it makes getting an ideal rendering of a difficult exposure scene easier, it is not a trivial process. Most of the time you need to tweak things here and there during the process to coax the image into the best rendering possible. The following tutorial examines some of my strategies for better HDR results using an image captured during my latest trip abroad to Bahrain.
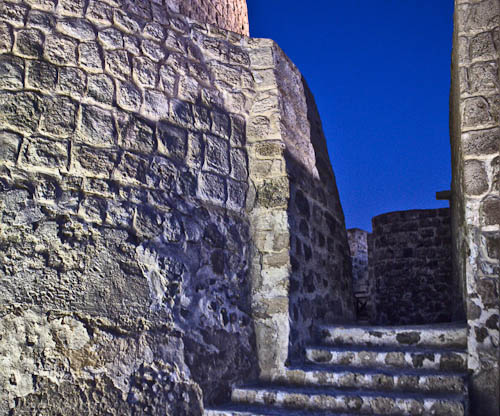
Here are the three shots taken at Bahrain Fort, a crusades era castle on the island Kingdom of Bahrain:

Here is the "normal" exposure – this could be the basis for a decent one-shot rendering but I was after a more enhanced look.
This first image represents the “normal” exposure and it could be adjusted in Lightroom and Photoshop to get to a pretty reasonable rendering. However, I was looking for a more enhanced look so I shot 3 different exposures, N, -2 & +2, handheld using the auto-bracketing feature of my Canon 1D mk2 DSLR. Each shot was optimized in Lightroom before exporting through the Nik HDR Efex Pro Plug-in for tone mapping. The basic adjustments for each shot are shown below in three screenshots of the Lightroom basic adjustment panel; from right to left: the normal exposure, the under exposure and the over exposure.
The strategy here was to set up the processing for enhanced texture and contrast for highlights in the underexposed image, midtones in the normal image and shadows in the over exposed image. I know that I will be tone mapping the three exposures into one idealized image but I will probably want to blend back some of the normal exposed image to balance it out and make it appear more natural.
I used the Exposure slider in Lightroom to elevate the highlights but still maintain the texture of the rocks in the lightest portion. I was unconcerned with the black shadows.
I opened up the shadows even more, with the Fill Light slider, in the overexposed version, and cranked the contrast and clarity all the way to get some more texture into the scene. In essence, I’m extending the range even further in a sort of pre-tone-mapping move.
Now I select all three files and click on the “Export” button at the lower left in the Library Module and then select the Nik HDR Efex Pro preset:
The Nik HDR Efex Pro plug-in preset asks you to set up file parameters for the result after tone mapping. Since I have no interest in 16bit Tiff files, I set up my own HDR preference to deliver an 8 bit file. Once you click on “Export” you are in Nik-land and the HDR Efex Pro interface takes over!
I find the Nik Plug-in to be the easiest HDR software to use and very often the default rendering provides the best starting place for tonemapping adjustments. It is easy enough to select some of the presets at the left, to see if any come close to what you want, and then tweak the look with the slider controls at the right. The right side of the interface offers plenty of customizing options.
I chose the “Realistic, Strong” preset as the best starting place for further adjustments and, after a few slider adjustments, I ended up with a new Tiff file that was imported back into Lightroom. From there I could compare all the versions easily before deciding what to do next.
Most often, I will go a little too far with the expectation that I can blend the tone mapped version back into one or ore of the other exposures to get the final rendering that I’m after. The straight Nik tone mapped version has good texture but a very noisy sky as well as exaggerated color saturation in the shadows and it just looks a little… cartoony ! I decided to blend this version back into the normal exposure version. Still in Lightroom, I selected both files and then selected “Edit in… Open as Layers in Photoshop” from the Photo menu…
When they open in Photoshop we have a new document with each version stacked one on top of the other ready for blending. However, since the images were shot hand held, the HDR version and the original normal exposure version are not going to be perfectly aligned and this will make blending much harder. Nik HDR Efex Pro does an excellent job of automatically aligning and blending the separate images and, fortunately we can do the same in Photoshop. Make sure both layers are selected in the Layers panel and then select: Edit-> Auto Align Layers.
This will get the two layers into a close match so that blending will be easier. I wanted to blend back some of the original shadow areas and completely replace the HDR sky with the original. The sky was relatively easy to mask out to reveal the underlying original document layer, but I used Advanced Blending Options to mix parts of the HDR shadow with parts of the original background layer. Selecting “Blending Options from the Layer options flyaway menu in the upper right corner of the Layers panel gets you the “Layer Style” dialog:

The Layer Style Dialog with the "Blend if" sliders set to reveal some of the underlying shadow detail.
Drag the far left “black” slider in towards the center of the “Blend If – Red” channel gradient to reveal the underlying (original, normal exposure) layer. Then Option/Alt click and separate the slider into two halves to get a smooth transition from the HDR layer to the original layer. I use these “Blending Option” effects a lot in my “10-Channel Workflow” and I invite you to check out the video tutorials for more detailed instructions on how to use this feature in Photoshop. The result after blending the two versions:
Compare this with the best Lightroom adjusted version that attempts to simulate the same look:
The true HDR blended version has much better detail and a much smoother sky with a more three dimensional look. I also liked the image in B&W with a subtle split tone effect:
The point of this exercise to alert you to the possibilities for fine tuning enhancements before during and after the HDR tone-mapping process. Real expertise only develops with experience using the available tools and not being satisfied with the first thing you see. The real fine art of cheating the limitations of exposure and dynamic range requires an evolved sense of taste for how far to push an image and that will be different for every subject. Keep experimenting with new ways to massage your images into renderings that convey a sense of being there in the scene!



Trackbacks/Pingbacks