Lightroom Removes the Curse of Mixed Color Lighting from Your Photos
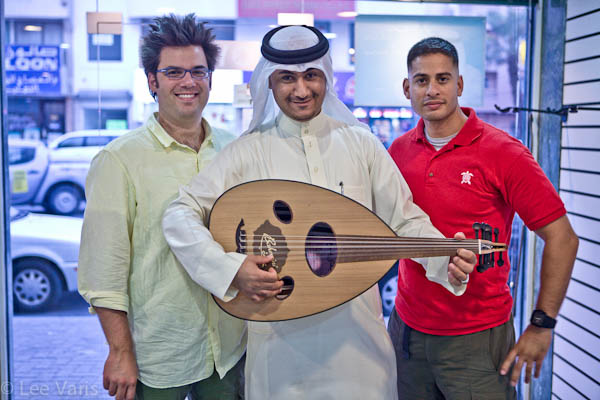
I’ve just now returned from the California Photo Festival, but before I share my experiences from that event, I’d like to stay with Bahrain a little bit to share a great technique for dealing with color casts associated with mixed lighting scenarios. The following image was captured as a quick snapshot of my traveling companions at a music store in Manama, the capitol city of Bahrain.
This image was shot very quickly and it clearly needs to be brightened up and the yellow color cast removed from the white clothing of our arab oud salesman (the oud is the ubiquitous middle eastern lute). The first step is to remove the yellow color cast caused by the tungsten lighting in the store – a quick click with the White Balance eyedropper does the trick…

Select the White Balance Tool (the eyedropper) and click on something that needs to be neutral to set the correct color temperature.
Now, after some simple brightness and contrast adjustments, we have good color on our subjects but we have an unusual blue/purple color cast in the background. The effect is jarring and quite distracting. This is actually a very common problem with interior shots that look out through a window into a sunlit scene. In this situation, the room lighting is a much warmer color temperature. When we balance the color for the warm tungsten lights by cooling down the color overall, we also cool down the background and this exaggerated blue cast is the result.
Fortunately there is an easy fix available to us in Lightroom. Go to the HSL panel choose Saturation and select the Color Target Tool in the upper left corner of the panel. You can now simply click and drag down on a color in the image to de-saturate…

The HSL Panel with corrections applied. The Color Target Tool is the little circle with up and down arrows in the upper left.
The result, after de-saturating the blue, is much less distracting, leaving the emphasis properly on the subject. This trick is quite effective in a number of different situations. The following image was shot inside the Grand Mosque. The original shows the blue cast of the light coming through the windows – a mis-match with the warm interior lighting.
Applying the blue de-saturating trick in Lightroom results in the following…
Beware of any warmly lit subjects that might have blue color in them (blue clothing, etc…) because as soon as you shift out the blue in the background the other blue in the image will also shift. In these cases you may have to process out two versions and blend them together with layer masks in Photoshop. I have found that, most of the time, this technique works quite well without too much effort in Photoshop


Desaturation is not the way to go imo. You suffer all color outside especially in the first image
For me best way to fix the problem of a blue cast due to mixed light sources is with LAB curves in the B channel using values. -B value will be blue cast. Add a center point in the B channel curve and move it to the left until it hits the crosshair. (where one did put the marker on the blue cast) now correct the added yellow. Put a marker on the shirt of the player and move that point down to correct the added yellow. And your done. Fixing the blue cast while preserving color.
See:
frist image:
http://img20.imageshack.us/img20/7342/screenshot5ou.png
second image:
http://img528.imageshack.us/img528/1348/screenshot6c.png
btw program used is opensource color correction utility delaboratory 0.5. Though this can be done in Photoshop as easy as in delab.
In very complex situations blending several versions could be needed though very rare if one does use this technique.
LOL… yes, I know all about doing color corrections in LAB but that doesn’t end up being a “simple fix” for most people. Your corrections are reasonable but don’t take the white neutralization far enough in either situation. Of course, a little more aggressive curve might have been enough, however, I think you’d probably have to mask off some of the correction to achieve the desired result. The “simple” solution I’ve shown here works well for the situations I’ve shown, does not require masking of any kind and can be done entirely inside Lightroom. Certainly, if the background in the first image shown was important in any way, you would have to actually adjust for the color temperature outside. This does not require a trip into lab as this was a RAW file. I would simple render out two different versions and mask the figures from one version into the other in Photoshop – relatively easy to do and it would look much better than your version. See: https://varis.com/Bahrain/BahrainFriends.jpg
Yeah your right. Your Bahrain image is excellent. It was just a suggestion. I am just a user doing my best. I did find out using the method i suggest It is important to correct the center again. So regarding that my post was premature.
In short move the center point to the left until the negative B values are as close to zero as possible. As that dit give an overall yellow shift, one needs to restore the center. So pick the point exactly above the center and move to the center. The values on the shirt should be exactly the same as before on did start or as close as possible on the image posted above i did not put the yellow correction point back to the center as i should have done.
http://img848.imageshack.us/img848/1820/varist.jpg
See here some better. For me it is very intuitive and fast. As one needs only to move two point as by using the numbers one can work very precise. Hope it helps people.
Btw are ok if you use your image for a simple tuto as it shows so excellent the problem of different types of light sources? I am no specialist btw only a user. Of course i will link to the this side, and your images and off course mention your name. I really did learn an awful lot of you thnx a lot for sharing your great work.
Thank you Martijn,
You are well on your way with LAB – easily the most powerful colorspace for serious color manipulations and your instincts are very good! Many photographers would not take the time to explore LAB and they would do well to really dig in and discover what its capable of.
Yes, you may use this image as an example in any tutorial you’d like – I appreciate your interest in my work! Please send me a link to your tutorial when you have it finished. I home to provide some more advanced tutorials here soon so stay tuned.
Thanks Lee.
Sure will do.
Here is the link
http://www.flickr.com/groups/delaboratory-users/discuss/72157627878741061/
As it very atm very premature, it is atm only open for invited. So please send a join request. If you have any comment please do.
I do make photographs only for 11 month. Though if you want to see what i do:
It is all very premature.
Regards,
Martijn
Litle update:
Not be cocky though help the photographers:
I really think they way to fix blue / yellow cast is my LAB method.
See here the original image where you did change the WB in PS and where PS did create the blue cast due to the different light types. This can be avoid by a very simple move in LAB.
Fixate the center set a marker at the shirt move the curve until be B values on the shirt are zero and your done.
No WB droppers, sliders or masking are needed . Very simple, precise and very effective:
http://img94.imageshack.us/img94/9926/screenshot20l.png