Photography on the Universal Backlot with APA LA
I recently participated in a special tour of Universal Studio’s backlot organized by APA LA to introduce photographers to the location rental services geared to still photographers. This was a fun event for APA members and we were allowed to wander through the standing sets that were not being used, especially the New York streets! I was particularly drawn to the older buildings – they looked very real but there was a surreal feeling due to the absence of crowds!
The sky was very overcast so the lighting was very soft and low contrast. These kind of conditions lend themselves to a high-contrast “grunge” look later in post processing and I was anticipating using this approach as I was photographing the scenes. I also brought a Lensbaby Composer with me and I thought it would be fun to try for a pinhole camera look or other antique camera feeling with the old fashioned street scenes. I had wide angle zooms with me – a 24-70mm and a 16-35mm, Canon 5D mk2 – pretty much open to whatever presented itself but I did have the thought that I wanted to avoid taking simple reference shots. Once I was in the process of photography, I started conceptualizing a theme of dreamlike images like faded memories for a place experience a long time ago.
I ended up taking a lot of pictures with the Lensbaby going for a lot of out-of-focus bokeh and I knew that ultimately the images would get some kind of extreme treatment in post. Once I had ingested all the shots from the day I started going through the images and applied one of my “grunge” presets in Lightroom to begin exploring different treatments for the images:
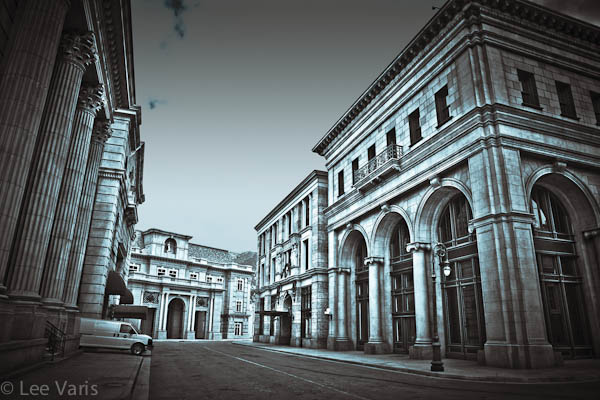
The image above is the result of overdriving Recovery, Fill Light, Contrast and Clarity.
This has become sort of a cliche in the past year and I don’t use it that often anymore but, with certain subjects, it can still be useful. These extreme settings in Lightroom will cause artifacts and emphasize noise but I was going for a very altered look anyway so I wasn’t that concerned. The next thing I did was to apply a warm/cool split tone to get the highlights to go blue-cyan and the shadows to go brown. Here I went for a more obvious colorization because I was thinking of getting a kind of antique process look. Normally, I use this kind of split tone in a very subdued setting with saturation very low – this gives a regular B&W image just a little more dimension.
After applying this look to all of the images I started going through them and pulling a few out for a little extra work in Photoshop. Photoshop allows for more detailed selections, more numerical precision and more retouching options so I almost always end up there for final image tweaks. This particular image received some additional highlights on the buildings and a gradient sky treatment…
Once I got to the Lensbaby images I felt like I was on to something with the extreme altered processing and the blurry bokeh…
Once I got here I knew I had to experiment with really distressing the image to see how far I could push this idea of vintage urban dreamscape. Most of the time I’m very concerned with the ultimate visual quality and aim for a detail everywhere approach but many times more is revealed by how much you don’t see in an image. I took a selection of the Lensbaby images into a new app called Vintage Scene – this cool little app, available from the Apple app store, provides a simple way to get borders and overlay effects that simulate torn, wrinkled, faded and otherwise age distressed looks in your image. I layered two versions together and added additional edge effects to create a supper aged version…
The process of re-imagining the images post capture can be very rewarding – sometimes I discover gems hiding in the rubble years after taking some pictures! Again, it is worth mentioning that you often don’t know if you’ve pushed an image far enough unless you too far and then come back… I’m still trying to decide how far to go with these images. Is the super distressed look worth pursuing? Do the processed Lensbaby images say enough by themselves? I will be making some prints next to see if I can arrive at a decision… In the mean time, I would be very interested in your comments –
Here’s a link to a full collection of “grunge” look images from the Universal backlot New York streets…
Here is a set of images that explore an antique distressed look…
Finally, I will leave you with an image that works well without any special treatment beyond simple contrast and a split tone – not everything requires the “grunge” look for maximum impact…
I am very interested in your opinions – please leave your comments about these different image treatments below!



Your thought process of planning the post processing when you shoot resonates with me. I think the editing is the part that makes photography fun.
I like your blue tone grunge look. It works well with the subject, but I wonder what the complete opposite might look like. I can picture yellowish dirty whites and red brown shadows with some muted colors intact.
I like the lens baby images a lot but personally don’t think the distressed look with border treatment is necessary. It’s starts looking like a Histamatic image which is cool too but something totally different I think.
I found your website from the facebook group Photoshop and Lightroom. Thanks for sharing.