Secrets of freezing peak action in photography
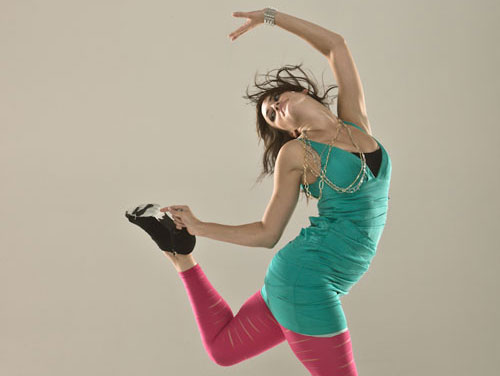
I did a photo shoot recently where the primary challenge was to capture dancers in action for the package design of a video game. In many cases the dancers were holding various game controllers but the object was not to replicate actual game play – instead, we were trying to give a sense of the user experience. Players of this particular game were supposed to feel like real dancers even though game play is limited to hitting specific pads or positions in time with music. I shot real dancers improvising moves to music playing in the studio. I taped off a small square on the floor to represent the area where a game controller pad would be and as a way to keep the dancers centered in one spot rather than moving all over the studio.
The lighting was designed to emphasize the sculptural form of the dancers body – I used a soft core lighting approach using two V-flats at the rear sides to create a rim lighting effect with a front fill light positioned high above the camera:
The client wanted to freeze the action for the sharpest possible image. This meant that I needed a fast shutter speed or, in this case, a short flash duration. Normal studio flash is usually short enough to “freeze” most motion but in some cases you have to maximize the action freezing potential with extra short durations. I used ProPhoto Studio Strobe packs for this sessions and turned down the power variators to 1/4 power. The continuous variable power controls the output by “shortening” the duration of the flash rather than just reducing the available power bringing the flash duration down from 1/500 sec to 1/2000 sec. This results is in better action freezing! In order to use faster flash duration (with less light output) I had to use a higher ISO of 800 rather than my usual 160 for in studio controlled light situations. Even with the extreme action stopping capabilities of this setup you can still see slight motion blurring in the movement of the lower foot in the lead photo above…
Apart from the technical considerations, capturing action requires a sense of anticipation. In this photo shoot, all the action was happening to the strong beat of techno-dance music. I simply (or not so simply) had to synchronize my captures to the beat of the music and I knew the dancer would “hit” some kind of peak action position. This brings up the danger of relying on continuos shutter shooting or motor drive shooting where you simply hold down the shutter and capture at your camera’s maximum shooting speed to cover the range of motion. This is a recipe for disaster in situations where there is a specific “peak action” period in the motion you are capturing. Motor drive mode is likely to just “miss” the actual peak – it will happen between frames because you do not directly control the moment of capture. Most sports photographers I know do not use motor drive shooting except when they want to capture a sequence of images that show the range of a complete action like a high jump, etc… If you want to catch the exact “peak” of that high jump you actually have to anticipate it and press the shutter release at that exact moment. This requires a lot of practice to master. There is a subtle delay from the act of pressing the shutter, through moving the mirror up to the actual moment of capture – each camera “feels” slightly different and you definitely need to cultivate a sensitivity to your specific camera to master this! Non- mirror cameras like the Leica rangefinder have an almost instantaneous shutter and that is why this system was the favorite of Cartier Bresson, the master of the decisive moment!
This photo shoot was a lot of fun and the client was very happy! It is extremely important to involve the client and art director in the shoot as its occurring. One way I accomplish this is by not using a traditional tethering approach for the camera at the studio. Instead of directly tethering the camera to the computer, I shoot to cards and take the video out from the camera and plug into a regular TV monitor! This puts the image that would normally show up on the camera LCD right after the capture onto the larger TV monitor that everyone can see. The monitor refreshes instantly with the last shot taken – much better than the 5 seconds or so that the tethered computer display can show! Although the display is not entirely accurate – it is just the “on-the-fly camera jpeg” rendering – the immediacy of the display is way more important in this kind of situation. Set your camera review settings to the shortest duration (typically 2 sec) this helps with the rapid refresh of the display – if you shoot extremely rapidly, faster then 1 shot per second, you might miss frames on the display even though you are actually capturing them. You can review the shots right after you capture them by using the controls right on the back of the camera – you don’t have to walk up to the computer or display so you don’t have to interrupt the momentum of the shoot.
I have a gallery with more shots from the shoot as well as production stills showing the “behind the scenes” action at: DanceAction – if you have any questions regarding the photo shoot post them in the comments and I’ll try to answer them…
