Here is the step-by-step tutorial on one of the images from my “Skin” book— I also use some of these foundation techniques in my 10–Channel Workflow
Lighten Skin with Channel Blending
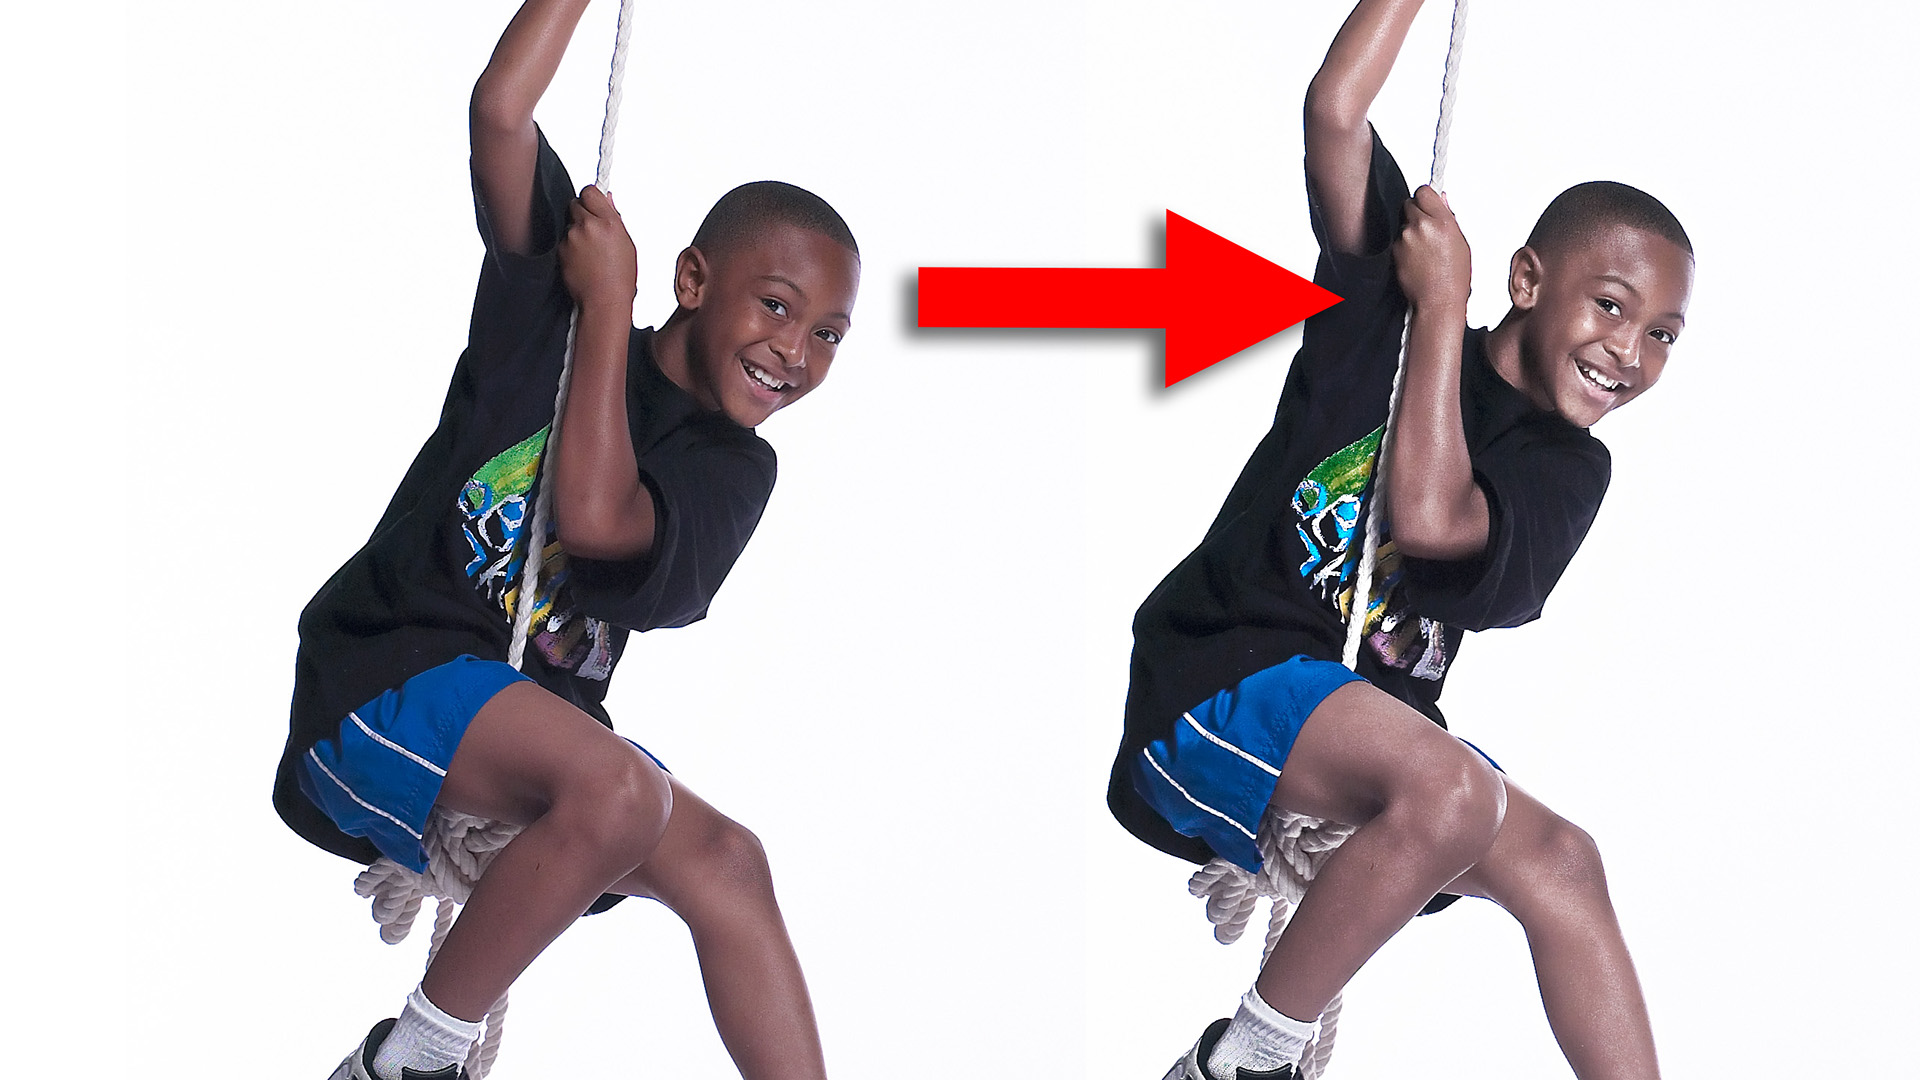
Here is a practical application of Channel Blending for a common problem with dark skin tones, especially darker African skin… I’m using an image here by my friend Anthony Nex. He specializes in photography of kids and related products, fashion, advertising and catalog work. He took this great shot of Jordan in the studio – all in all a very good action shot.

However, the dark skin tone can often pose a problem in print. Skin this dark can get a muddy, plugged up look even with a high quality inkjet print. The trick is how to lighten it in a natural way that doesn’t look forced or too contrasty!
The following tutorial shows how to create a very sophisticated correction that relies on channel blending techniques to control the values in the RGB image (you might want to right-click on the image to save it so you can follow along*). This achieves a result that is impossible to replicate with normal corrective techniques like Brightness-Contrast, Levels or Curves. The ideas in this tutorial build on material in a previous blog post you can find here: http://blog.varis.com/?p=213
The key here is to look at the individual channels to see if one of the three channels has a better luminosity range than the others. In this case the obvious choice is the red channel. So we will utilize that red channel using a channel blending trick to lighten the dark skin. Start by creating a Channel Mixer adjustment layer:

You can do this either by selecting from the Adjustment Layer icon at the bottom of the Layers panel or by clicking into and selecting from the Adjustments panel directly…

Once you have the Channel Mixer layer in place, select “Black & White with Red Filter (RGB)” from the presets drop down menu.

The result will be a grayscale image representing the Red channel from the color image.

Change the blending mode for the Channel Mixer layer to “Luminosity” from the drop down menu right under the Layers “tab” in the panel.

Like magic the skin tone is lightened – but there is a slight problem. Can you spot it?

If you saw the shorts go black, give yourself a pat on the back! This would be an easy thing to mask out but there is an easier trick that works like a charm…

Double click into the empty area next to the thumbnail (not on the text or you will just edit the name of the layer) for the Channel Mixer layer in the Layers panel and you’ll call up the Layer Style dialog (you can also select “Blending Options” from the Layer options flyaway menu at the upper right corner of the Layers panel)…

We’re interested in the “Blend If” area at the bottom of the dialog. This is a little used but very powerful tool for masking areas of the image based on their luminosity. The gradient on top represents the luminosity of the selected layer and the gradient on the bottom represents the luminosity of the layers underneath. Select “Red” from the “Blend If” drop down menu – we’re now going to use the luminosity of the Red channel to mask off the effect of the channel mixer adjustment. Pull the little black triangle slider at the left towards the center until the blue shorts re-appear. We’re telling Photoshop to “blend through” to the underlying image everywhere the red channel is black. The blue shorts are black in the red channel and the skin is much lighter so we can easily remove the Red channel effect from just the shorts without painting a mask. Once the black triangle is in the appropriate position hold down the Option or Alt key and pull the two halves of the triangle apart – this will create a smoother transition in the virtual mask!

Now that we have lightened the skin it may seem like the skin color is a little less saturated than we would like. Darker skin tone is less saturated than lighter skin and now that we’ve lighted his skin we might want to compensate by adding a little saturation. Return to the Adjustment panel and click on the left facing arrow at the bottom left of the panel to get to the other Adjustment types. Select the Hue/Saturation adjustment…

When the Hue/Sat adjustment comes up select “Reds” from the “Master” dropdown menu – we only want to adjust the skin saturation and skin color is mostly red as far as Photoshop is concerned. Push the Saturation slider to the right to increase the saturation but don’t overdo it. I felt that +15 was far enough. You can also adjust the Hue slightly if you feel that the skin color is now just a little pink looking – by pushing the Hue slider to the right a tiny bit the skin will get slightly yellower which might work better for the lighter skin color.

So far so good…

We could probably stop now but perhaps, after so much lightening, the contrast may seem a little flat. We could use a curve of course but I wouldn’t really want to affect the T-shirt or shorts with a global curve. I don’t want to force any part of his skin tone to get darker either. So… here is another trick to pop the highlights on his skin.
Start by selecting “Merge Visible” from the Layer options flyaway menu WHILE holding down the Option/Alt key (very important!) This will place a copy of the image with all the adjustments of the layer stack at the top of the Layer stack (shown here as Layer 1)

Desaturate this layer using a Hue/Saturation adjustment directly (from the application menu at the top of the screen): Image-> Adjustments-> Hue Saturation…

Push the Saturation slider all the way to the left to end up with a gray image. Bear with me here – this step helps prevent an unwanted saturation boost once we get to the Overlay step…

At this point you might want to rename the layer “Highlights” to indicate its function so you don’t get confused later when you open the image back up.
Now we’re going to run a filter on this layer. This layer will then be applied in Overlay mode to complete the effect but for now select: Filter-> Other-> High Pass…

At low radius settings the resulting image can be used to create a kind of sharpening effect – we are after a more bas-relief kind of look so use a larger radius (here about 15) to create a more sculptural look – you are looking for the maximum contrast in the highlights on the face…


After applying the filter change the Layer blending mode to “Overlay…”

The result will have more contrast but we will want to limit that contrast to just the highlights – right now the shadows are getting darker as well and that is giving the image a harsh look!

We’re going to blend though the darkening portion of the Overlay layer using our little friend the Layer Style dialog. As before, double-click into the empty section next to the Thumbnail for the layer…

This time use the black slider in the upper gradient and push it to the exact center so that it reads 128 – now anything that can darken the underlying layers is blended through so it has no effect. We are now left with just the highlights intensified. This gives us a nice sculptural effect without adding the harshness that extra contrast would normally have. Compare with the unaffected image…


The correction is now complete and we have enhanced the shape of the face and other areas of skin at the same time lightening the skin without having to create a mask to control the effect. See how much more alive and 3-dimensional the image seems compared to the original. You can tweak the intensity of the effect very easily because everything is in a layer – just adjust the layer opacity for any of the layers to suit…

This channel blending technique has many variations and can be applied to a wide range of imagery to create enhancement effects that are quite powerful but very natural looking. The key is in analyzing the individual channels of the color image and applying the grayscale luminosity of these channels against the color image to affect the value structure of the image – photography is all about the lights and darks!
I have numerous advanced tutorials like this on my web site at: www.varis.com You can also find a video tutorial on the 10-Channel Workflow that goes through a more advanced image enhancement routine (using channel blending concepts) in the videos section. I have a complete online course that examines all of the more advanced concepts in much more detail called: The 10-Channel Workflow—enroll here: 10-Channel Workflow Online
Lee Varis is the author of the best selling book Skin:the Complete Guide to Digitally Lighting, Photographing, and Retouching Faces and Bodies.
As well as his latest book Mastering Exposure and the Zone System for Digital Photographers
* special note: this image is copyrighted by Anthony Nex © 2004, please respect his rights and only use this image for your educational efforts, thank you



Trackbacks/Pingbacks