While Lightroom 4 is still in beta, it is clear that there have been major changes to this preeminent photographers tool, especially with regards to RAW processing. This has serious implications for my digital zone system. Fortunately this doesn’t require shooting a new test if you have already done one using my guidelines.
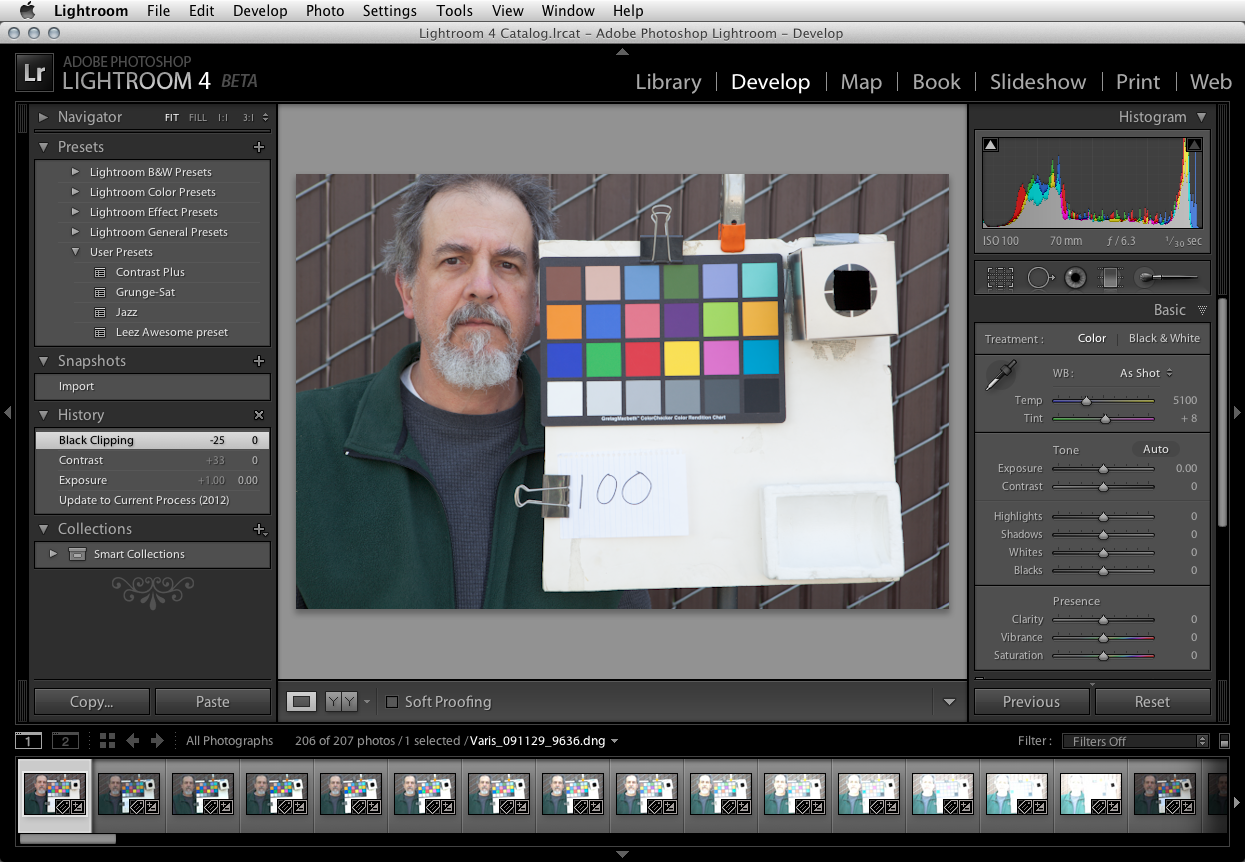
I was initially disturbed by the changes to the basic panel in the Develop module—what happened to Fill Light and Recovery? Why do Blacks and Whites move up and down?

Basic Panel from Lightroom 4

Basic Panel from Lightroom 3
It is clear that Adobe wanted to make the behavior of all the sliders consistent so that all values can move up or down from a default center but the result had my legacy tests showing an Exposure slider setting at minus 1.00! They changed what all the sliders mean—how was I going to make sense of all this with my Zone test? After I finished grumbling and cursing, I decided to see what things looked like if I re-evaluated the test with the new zero defaults.

You can use the same test shoot you did for Lightroom 3 - just update the settings and re-set to the new "zero"
The evaluation process is exactly the same—set all sliders to zero and look for the mid-gray patch that is closest to 51% but make sure the white patch doesn’t go higher than 90%—now the direct sun tests showed a match to the expected ISO of 100, the open shade test matched up with an ISO of 125 (gained 1/3 stop of sensitivity) and the Tungsten test was pretty close to what it had been at about +2 ISO! The most immediately apparent result was that the test images looked better overall with the new defaults. They were not so flat and dull; their contrast was more normal and they didn’t require any tweaks to get a pleasing result—just leave it all at zero!
An even nicer surprise came when evaluating the dynamic range. Open shade and direct sunlight picked up a full stop of range, mostly on the shadow side but still a good stop of useable range! There seems to be less noise in the shadows with the new process! This is certainly good news. When evaluating the shadows, we look for the exposure that renders the mid-gray patch (3rd from the right at the bottom of the ColorChecker target) closest to a zone 1 or 10% RGB values in Lightroom (the numbers under the histogram in the Develop module)

The mid-gray patch, at the far left of the screenshot, should read closest to 10% in the last useable exposure before noise becomes unbearable.
The idea is to find out how many ƒ-stops you can underexpose before you drop to unusable black. The new process gives cleaner dark values so there is useable tone separation 2/3 – 1 stop darker than before!
Also check the highlight side to see where you get a zone 9 (90%) value…

The Mid-gray patch (also at the far left) shows an RGB reading of closest to 90% for the upper limit of overexposure
Now you simply count back to the normal 51% (or closest) value to find out how many stops of room you have on the highlight side. Add to that the number of stops you found for the shadow side and you have your useable dynamic range! As I mentioned earlier, I found between 2/3 to 1 ƒ-stop more dynamic range using Lightroom 4 than Lightroom 3!
The other notable improvement is with overall quality, smoothness of tone and lack of artifacting with extreme slider positions! The following example shows the same image processed in Lightroom 4 and Lightroom 3. This was an example image from my book “Mastering Exposure and the Zone System for Digital Photographers”

This comparison shows Lightroom 4 on the left vs Lightroom 3 on the right.
I was unable to get the sky dark enough in Lightroom 3 using just the global adjustment and had to use an additional gradient adjustment to further darken the sky. Lightroom 4, on the other hand, was quite capable and I got smoother results using the Basic panel only. In addition, Lightroom 4 delivered these results without any edge artifacts which were very evident in Lightroom 3…

You can see the nasty edge artifacts on the right – the result of extreme Fill-Light vs Recovery slider settings in Lightroom 3
There is also better shadow detail in Lightroom 4 and the results don’t look as harsh—again, all without artifacts!

Lightroom 4 on the left vs Lightroom 3 on the right
Lightroom 4 seems to offer more adjustment range with more detail without introducing edge artifacts—a very clear improvement! Here are the slider settings that gave me the improved rendering of this difficult image:

Even extreme settings in Lightroom 4 deliver very pleasing results.
Adobe has really delivered a winning upgrade with Lightroom 4. Its surprising to see such a clear improvement in a product that was already first in its class. Its almost like getting a brand new camera for the modest price of a software upgrade!
To get a detailed tutorial on shooting and evaluating a zone test like I describe here, please signup for my email list and you will receive a 38 page, step-by-step PDF tutorial in 2 parts!


Hi Lee,
Thanks for the heads-up and the demonstration.
I’ll be looking for more,
Mark
Hi I am doing a photography course and needs to do greyscale test and build a zone ruler please guide me in how I can build my zoneruler
Sign up for my email list from the sidebar in any of the internal pages on my website & I’ll send you a PDF on the Zone System – you’ll find instructions for building a “zone ruler” in part-1